
The Complete Guide to Group Portrait Photography: Posing, Lighting & Camera Settings
Master group portrait photography with professional techniques for posing, lighting, and camera settings. Learn how to photograph groups of any size, from small families to large corporate teams.
The Complete Guide to Group Portrait Photography
Whether you are photographing a wedding party, a corporate team, or a family reunion, the hero image below illustrates the tiered arrangement, even lighting, and clear face visibility that define successful group portrait photography from the first frame.

From small families to large corporate teams, the techniques in this guide apply across portrait photography scenarios where multiple subjects must look natural, sharp, and evenly lit — skills that separate confident professionals from photographers who dread the group shot segment of every event.
From Small Families to Large Corporate Teams, Here’s How to Get It Right
I’ve been shooting professionally for long enough to know that group portraits make photographers nervous in a way that almost nothing else does. One-on-one, you can work your magic. But put fifteen people in front of your lens, and suddenly you’re a ringmaster, a therapist, a lighting technician, and a voice coach all at once.
Here’s the truth: group portraits don’t have to be stressful. The photographers who nail them consistently aren’t magical—they’re prepared. They know exactly what they’re walking into, they’ve got a system, and they treat the human element as seriously as the technical one.
This guide covers everything I wish someone had told me years ago: how to prepare, how to pose, how to light, and how to keep your sanity while doing it. If you’re photographing weddings, corporate events, or large family gatherings, this is the playbook.
Key Takeaways
Preparation is everything. Group portraits succeed or fail before you even raise the camera. Shot lists, location scouting, and clear communication are non-negotiable.
You have thirty minutes. That’s it. After that, genuine smiles disappear, and people start looking like hostages. Ten formal setups is your maximum.
Even lighting beats creative lighting. In group portraits, your goal is consistency. Every face should be lit similarly. Harsh shadows and patchy light ruin the shot.
Depth of field is your biggest technical challenge. With multiple rows, you need f/8 minimum. Focus at the boundary between the first and second thirds of the group.
Movement creates connection. Static poses look rigid. Encourage interaction, touch, and natural body language. A hand on a shoulder transforms a lineup into a family.
Introduction: Why Group Portraits Matter
Most photographers dread the group portrait segment of a wedding or corporate shoot. It’s chaotic. People wander off. Aunt Margaret won’t stop talking. The best man has disappeared for a smoke break.
But here’s what Paul Santos, an award-winning wedding photographer, says about this: “These photographs are valuable and become more valuable in time. During the wedding, those important people won’t be standing together in a pleasing format by coincidence. As a photographer, I need to make these photos happen, and take control of how it happens, and where it happens.”
That’s the mindset shift. You’re not taking a picture—you’re creating a record that will sit on mantelpieces and in family albums for decades. The people in that group won’t always be together. The kids grow up. Grandparents age. That corporate team won’t stay intact forever.
Your job is to make sure the moment is captured cleanly, beautifully, and without anyone looking like they’re being held at gunpoint. So let’s talk about how to do that.
1. Preparation: The Foundation of Successful Group Portraits
User Question: What should I do before the shoot to ensure everything goes smoothly? Search Intent: Planning and logistics for stress-free group photography.
The photography itself might take ten minutes. The preparation takes hours. That’s not a problem—it’s reality.
1.1 Define the Purpose and Shot List
Before you do anything, understand why the group is gathering and what the client actually needs.
For weddings, Santos recommends a simple rule: “Always know who the most important people are and always have a paper outlining all the shots the couple want.” That paper is your bible. It tells you what combinations you need: bride with parents, groom with siblings, both families together, the college friends, the work crew. Without it, you’re guessing, and guessing wastes time.
For corporate shoots, the purpose is usually cleaner: team photos, department headshots, maybe a hero shot for the annual report. But don’t assume. Ask.
For large family reunions, the shot list is often a negotiation. Everyone wants different combinations. Listen to the request, note it down, and prioritize.
1.2 Scout the Location
You should never walk into a group portrait blind. Santos scouts every venue: “Walk the space. Check the light. Visualize your compositions. Planning here reduces surprises later.”
Look for:
- Open space. You need roughly 2 feet of width per person. For a group of 20, that’s 40 feet of clear space. For 50, you need 100 feet. If you don’t have the room, you can’t shoot the group.
- Natural tiers. Steps, slopes, or outdoor amphitheaters are gold. They let you create multiple rows without complicated equipment.
- Shade. If you’re shooting outdoors, find open shade or an overcast location. Harsh sunlight is your enemy. More on this in the lighting section.
- Backup options. If the weather turns, where do you go? Have an indoor plan ready.
1.3 Communicate with the Group
“Most group photo issues happen long before the camera ever comes out,” says photographer Karen Quist. She’s right.
Send wardrobe guidance at least a week in advance. Ask for earth tones, jewel tones, or a coordinated color palette. Avoid primary colors—red, orange, bright yellow, and neon green act as visual lightning rods in group shots. Patterns can also be distracting; solid colors generally work better.
Provide clear logistics: where to go, when to arrive, how long it will take, what to expect. Ambiguity creates anxiety. Anxiety creates stiff expressions.
Professional Tip
Arrive 30 minutes early for setup. “The photography itself may only take a few minutes. However, the preparation is what makes that possible.” Use that time to set up lighting, test exposure, and mentally rehearse your directing flow.
Common Mistake
Assuming everyone understands the plan without clear communication. People will wander. They’ll get coffee. They’ll be on their phones. They’ll think “the group photo” means “the one at the end.” Assign a helper—a friend or family member who knows everyone’s name—to wrangle the group and call people in.
2. Group Size Classification: One Size Does Not Fit All
User Question: How does the approach change for different group sizes? Search Intent: Understanding size-specific techniques.
The techniques that work for four people will fail for forty. Here’s how the approach shifts by group size.
2.1 Small Groups (2–5 People)
This is the easiest category. You can use wider apertures (f/2.8 to f/5.6) and more creative compositions. The lighting can be precise, even individual.
The key here is connection. A small group should feel intimate, not static. Turn people toward each other, create small interactions, and avoid the disconnected “lineup” look.
2.2 Medium Groups (6–20 People)
This is where things get serious. You need tiered arrangements and smaller apertures—f/8 minimum.
What does “large” mean? Karen Quist defines it relative to your experience: “If you are used to photographing couples or taking individual portraits, large could mean a group of five people. In general, I consider large to be a group of seven or more.”
For medium groups, you can still shoot with a single light source and a reflector. It’s manageable. Just watch for shadows—more people means more opportunities for one person to block light from another.
2.3 Large Groups (20–50 People)
This is where preparation separates the pros from the amateurs. You need:
- Significant space — 2 feet of width per person is a hard floor minimum
- Multiple rows — three rows minimum for 20 people, four rows for 50
- Aperture of f/8 to f/11 — or higher
- A tripod — you’ll be taking multiple frames for head-swapping
- A helper — someone who knows names and can call people in
2.4 Very Large Groups (50+ People)
These are rare but not impossible. The key: start with the largest grouping first, when energy is highest. People are fresh, they’re excited, and they haven’t started fading yet.
You may need a panoramic composite if the group exceeds your lens’s capacity. More on that in the equipment section.
Professional Tip
“Start with the group photo first. People disappear. Meetings happen. Then someone suddenly needs coffee.” The larger the group, the earlier in the schedule you should place it. Don’t wait until the end of a wedding or corporate event—you’ll be chasing people who’ve already mentally checked out.
3. Posing and Arrangement Systems
User Question: How do I arrange people so everyone looks good and nothing looks awkward? Search Intent: Practical posing techniques.
The poses that look natural in a group photo are almost never natural. They’re engineered. The best group portraits look like everyone just strolled in and stood there, but that took work.
3.1 The Tiered System
The tiered posing diagram below is the foundation of nearly every successful group portrait — taller subjects belong in the back row while shorter people sit or kneel in front, a pattern explored further in our family portrait photography and wedding photography guides.
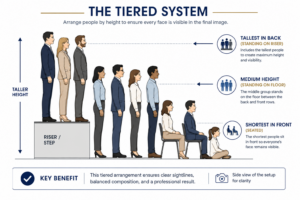
When you study the tiered arrangement in the diagram above, notice how each row creates a distinct height plane that prevents back-row subjects from being hidden — the same principle applies whether you are working with a corporate team on office steps or a wedding party on church stairs.
Tallest people in the back. Shortest in the front. Use steps, stairs, slopes, or chairs to create natural tiering.
“If your subjects are huddled close together on a level surface, chances are the people at the back will only be visible from the eyes up.” Stairs solve this instantly. No stairs? Use chairs. Place some people standing, some seated, some on the ground.
3.2 The Triangle Method
Once tiered rows are established, the triangle method prevents the dreaded totem-pole effect — the diagram below shows how connecting head positions with imaginary lines creates visual rhythm across any portrait grouping from five people to fifty.
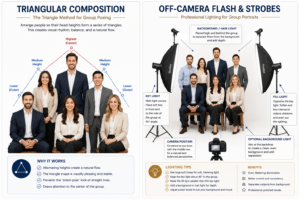
The triangle arrangement visible in this diagram works alongside tiered posing and the chair technique covered later in this section, giving you a reliable system for family groups, wedding parties, and executive teams alike.
This is the most useful rule in group posing. Draw imaginary lines connecting people’s heads—they should form triangles, not straight lines.
Why? Straight rows—one head directly above another—look like a totem pole. Triangles create visual rhythm and ensure every face is visible.
For example: place parents in the center. Taller children on either side. Shorter children between them, creating a triangle of heads. It works for groups of five or fifty.
3.3 Building the Group Gradually
This technique changed my work. You don’t pose twenty people at once. You build outward.
Start with the key subjects—the couple, the CEO, the grandparents. Then add individuals or pairs around them. Then the next layer. Then the next.
As one photographer explains: “I’m building on the group; that’s the key. Always build. We don’t have to start all over with every pose from the ground up.” Each new composition takes only a few seconds to adjust because most people stay in place.
3.4 Avoiding Empty Spaces
Group photos should feel connected, not gapped. Keep people close enough that their shoulders lightly touch or overlap. Partial overlap is acceptable—in fact, it creates natural depth.
For the edges of the group, turn people slightly inward. This keeps the group’s energy focused toward the center.
3.5 The Chair Technique
When structure is needed, bring in a chair. Santos uses chairs to create symmetry and balance: “My appeal for symmetry is satisfied with three bridesmaids on either side. Here, the two chairs provide balance and a little more structure to the image.”
Chairs work better than stools because stool height can create awkward gaps in the triangular composition.
Professional Tip
“Give awkward dangling arms purpose. Pop a man’s hand in his pocket for example. Tell terrible jokes and have guests laugh with you and sometimes at you. This is how you build trust and connection.” People don’t know what to do with their hands. Give them a job.
Common Mistake
Lining everyone up in a straight row. “It’s a group portrait, not a police lineup!” Break the row. Use levels. Vary head heights. Create visual rhythm.
Case Study: The Mother-Son Portrait
In the original source material, Figure 90 demonstrates a classic before-and-after: the same two subjects, disconnected and stiff on the left, turned toward each other with natural engagement on the right. The second version has human warmth. The first could be cut into two separate portraits.
This principle applies to every group portrait. The connected version is always better. Use touch, lean, and interaction to create cohesion.
4. Background Selection and Location Scouting
User Question: What makes a good background for group portraits, and where should I shoot? Search Intent: Location choices and background management.
The background is where many group portraits go wrong. Too much clutter, too many competing lines, and suddenly your subjects are lost.
4.1 Simplicity Is Key
“By its very nature, a group shot is cluttered. With so many different faces and competing outfits, your group shot can end up looking very messy if the background is also complicated.”
Your best options:
- Parks, gardens, and beaches — “The colors of nature never seem to clash or compete with your subjects.”
- Unadorned walls — brick, stone, or painted surfaces
- Old buildings with steps — architectural interest without visual chaos
- Clean modern architecture — lines that frame rather than distract
4.2 The Three-Meter Rule
Keep the background at least three meters behind the back row of your group. This prevents the background from competing with your subjects while allowing a slight unsharpness that separates them.
If the background is too close, it becomes a visual magnet. You want the viewer looking at faces, not the wall behind them.
4.3 Indoor Studio Considerations
Studio shooting gives you total control, which is both a blessing and a curse. You have to set everything up yourself, but you can also design exactly what you want.
Use seamless paper backgrounds. Choose colors that complement but don’t distract. Keep the walls light to reflect fill light. See our studio lighting guide for indoor group setups.
4.4 Environmental Group Portraits
Sometimes the background tells a story. A corporate team in their office, a family at their home, a sports team on their field—these locations add meaning.
Just ensure the environment doesn’t overwhelm the subjects. The faces should always be the focal point.
Professional Tip
“Walk the space. Check the light. Visualize your compositions. Planning here reduces surprises later.” Never choose a location based on looks alone. Visit at the same time of day you’ll shoot. Check light patterns, shade availability, and sight lines.
Common Mistake
Choosing a “cool” background that distracts from the subjects. Your clients aren’t there to show off the location—they’re there to show off themselves. Keep it simple.
5. Lighting Strategies for Groups
User Question: How do I light a group so everyone looks evenly lit and natural? Search Intent: Practical lighting solutions.
Lighting for group portraits is different from individual portraiture. The artistry takes a backseat to even coverage. Everyone needs to look good. You can’t have one side lit beautifully and the other in shadow.
5.1 Natural Light: The Preferred Approach
Soft, even light is your goal. Open shade or overcast skies are ideal. Early morning and late afternoon (golden hour) are best when the sun is warm and gentle.
If you’re stuck shooting midday, find open shade—beneath a large tree, in the shadow of a building, or on the north side of a structure. Importantly, “make sure the light falls evenly on your group, and that there are no patches of sun on anyone.”
5.2 Outdoor Lighting Challenges
Harsh sunlight creates squinting, raccoon eyes, and blown highlights. Avoid it.
If you must shoot in sun, the rule is simple: put the sun behind and slightly to the side of the camera, so it’s not in anyone’s eyes. Use a reflector to fill shadows.
5.3 Off-Camera Flash and Strobes
When open shade is unavailable, the off-camera flash diagram below shows the standard two-strobe setup used for large group portrait sessions — raised modifiers feathered across the group deliver even coverage without the harsh shadows that ruin indoor and outdoor team photos alike.
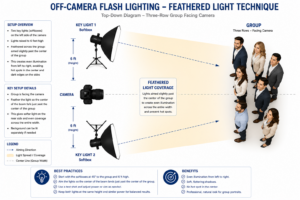
Study the strobe positions in the diagram and compare them with your ambient exposure using a light meter — balanced flash and ambient light, as detailed in our camera settings guide, produces natural-looking results for corporate and wedding group portraits.
When natural light isn’t enough, bring in strobes.
The standard setup for a large group: two off-camera flashes with large modifiers (umbrellas or softboxes) raised to 5-6 feet, positioned on one side of the camera, feathered across the group.
Why feather? Because direct light hits the center brightest and falls off at the edges. By aiming the light slightly past the group’s center, you create more even coverage across the whole width.
For indoor corporate shoots, this setup is common: “The main light was an XPLOR 600 Pro in an Elinchrom 59″ Inverse softbox, feathered across the group, with an eVOLV 200 in a Photek Softlighter II for fill.”
5.4 Indoor Lighting Setups
Small groups (2-3 people): one key light and a reflector on the opposite side is enough.
Large groups: you need more power and broader coverage. Two or three lights, each covering a section of the group, with fill reflectors or additional fill lights.
Avoid “campfire lighting”—lights at knee level that cast unflattering upward shadows. Raise the stands to 5-6 feet or higher.
5.5 Avoiding Shadows
“Make sure no person is casting a shadow onto another member of the group. This is sometimes easier said than done! Generally speaking, the more that you can bring everyone’s faces onto a single plane (by, for example, having those in the back row lean forward), the easier this will be.”
If shadows appear, raise your lights higher or reposition them. It’s usually easier to move lights than to move twenty people.
Professional Tip
Use a light meter. “Adjusting the power of your strobe till it matches the settings for your ambient light. This way both your flash and ambient light are balanced giving you a well-lit, but natural looking photo.”
Case Study: The Corporate Team Lighting Breakdown
For a 20-person executive team shoot, use:
- Two off-camera flashes with shoot-through umbrellas, raised to 6 feet
- Flashes positioned on one side of the camera, feathered across the group
- Aperture f/8, shutter 1/50, ISO 800
- Flash power around 1/8 to 1/4 depending on ambient light
The result: even, natural-looking light across the entire group.
6. Depth of Field and Camera Settings
User Question: What aperture and focus settings keep everyone sharp in a group portrait? Search Intent: Technical settings for sharp groups.
The most common technical mistake in group portraits: not enough depth of field. Someone in the back row is soft, or the front row is sharp while the middle row is just slightly out.
6.1 Understanding the Variables
Depth of field depends on three things:
- Aperture — the smaller the aperture (higher f-number), the deeper the DOF
- Subject distance — the farther you are from the group, the deeper the DOF
- Focal length — the shorter the focal length, the deeper the DOF
No single f-number works for every situation. A 50mm lens from 15 feet at f/8 gives you approximately 5-6 feet of DOF. That’s enough for a two-row group but not enough for four rows.
6.2 Aperture Selection Guidelines
Choosing the wrong f-stop is the fastest way to lose sharpness in a multi-row group portrait — the aperture chart below maps group size and row depth to recommended settings, complementing the depth of field guide for photographers who need everyone in focus from front row to back.
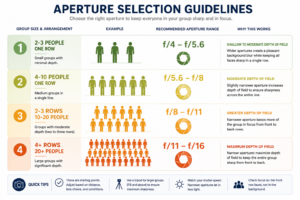
Keep the chart handy when setting up your camera settings, and always shoot a test frame at the recommended aperture before directing a large family or corporate group into their final positions.
Use this as your starting point:
- 2-3 people in one row: f/4 to f/5.6 may be sufficient
- 4-10 people in one row: f/5.6 to f/8
- Multiple rows (3+): f/8 minimum, often f/11 or higher
- Four or more rows: f/11 to f/16
“To photograph a large group, I’d recommend playing it safe and using a 50mm lens. Depending on the depth of your group arrangement, stick with an aperture of f/9 or higher to ensure that everyone is sharp, and always do a test shot first.”
6.4 Focus Point Placement
Where you focus matters as much as your aperture.
The rule: focus at the boundary between the first and second thirds of the group depth. If your group is 9 feet deep, focus at roughly 3 feet into the group. This gives you one-third of the DOF in front of the focus point and two-thirds behind.
“Normal procedure would be to focus more near the middle depth of the group (or slightly in front of the middle).”
6.6 Shutter Speed Considerations
Small apertures mean less light, which means slower shutter speeds. With a tripod, this is fine. Without one, you risk camera shake.
For large groups with multiple rows, “shoot with a wider aperture of f/5. Stacking three rows of people in separate planes requires a broader depth of field, even if they are close in proximity to each other.”
If you’re in low light, increase ISO rather than dropping shutter speed below 1/60. Motion blur from people shifting is just as bad as camera shake.
6.7 Autofocus Settings
For static groups, use AF-S (single-point) and focus on the eyes of a person in the optimal focus position.
For large groups where people might move, consider Wide-area AF (People). As Santos explains: “For a large party, wide-area AF (People) restricts focusing to the moveable box you select. This was excellent when I was photographing a group portrait in front of a set of paintings and the camera also wanted to focus on the eyes of the paintings.”
Professional Tip
“Take a few steps back: distance usually makes a bigger difference than going from, say, f/8 to f/16.” If you can increase your distance to the group, you’ll get significantly more DOF without stopping down to diffraction-inducing apertures.
Common Mistake
Focusing on the front row or back row instead of the optimal point one-third into the group. “Focus on the near ones, or on the far ones, you have wasted half of your DOF range in empty space.”
7. Lens Selection and Equipment
User Question: What lenses work best for group portraits without distortion? Search Intent: Equipment recommendations.
7.1 Focal Length Recommendations
Lens choice directly affects distortion and how many subjects fit in frame — the focal length comparison chart below summarizes when to reach for a 50mm, 85mm, 24-70mm zoom, or 35mm during group portrait sessions, building on principles from our lens selection guide.
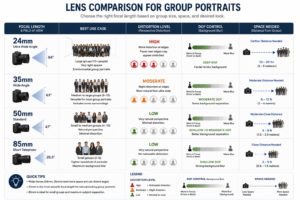
Refer to the chart when packing gear for a wedding or corporate event, and remember that stepping back with a longer focal length often beats stopping down to f/16 for keeping every row sharp in portrait work.
50mm — The Safe Choice
“To photograph a large group, I’d recommend playing it safe and using a 50mm lens.” Minimal distortion, natural perspective, and good for most groups.
85mm — The Portrait Hero
“With an 85mm, you can distance your subjects from the background and your camera, creating wonderful focus and bokeh. Within group portraits, people take up a large part of the frame, which is even easier with the 85mm.”
24-70mm f/2.8 — The Workhorse
A versatile zoom that covers everything. Wide enough for large groups, tight enough for small ones. Many pros keep this on one body for group shots.
35mm — The Tight-Space Option
Good for larger groups in confined spaces. But beware: “Using a wide angle lens will lead to ‘big head syndrome,’ where the folks in the front row will seem huge compared to those behind them. Use a longer focal length to compress the rows.”
7.2 Avoiding Wide-Angle Distortion
“To avoid distortion when using a lens that is 50mm or below, make sure you leave plenty of space between the people at either side of the group, and the edge of the frame.”
Extreme wide-angles (under 24mm) will stretch people at the edges. Avoid them unless absolutely necessary. For large groups, a 24-70mm at 35mm or 50mm is a better choice than a 16-35mm at 16mm.
7.3 Tripod Benefits
For large groups, a tripod is essential:
- Prevents camera shake at slow shutter speeds
- Maintains consistent framing for multiple shots
- Enables head-swapping composites in post-production
- Frees you to direct the group instead of holding a camera
“When photographing a large group, you’ll probably want to keep your subjects in one position while you fire off lots of similar shots. A tripod has the benefit not only of preventing camera shake, but allowing you to take a number of shots at the same angle and focal length.”
7.5 Backup Equipment
“Always have backup equipment on hand, including extra batteries, memory cards, and even a secondary camera.” For commercial shoots, redundancy is non-negotiable. If a battery dies or a card fails, you need to keep shooting immediately.
Professional Tip
For panoramic composites of very large groups: use a normal lens (50mm or 85mm), pivot the tripod-mounted camera parallel to the group, and shoot overlapping frames. Stitch them in post-production.
8. Client Management and Group Direction
User Question: How do I manage a group of people so everyone listens and looks natural? Search Intent: People skills and directing techniques.
The technical stuff is easy compared to managing twenty people with different attention spans, personalities, and levels of patience. This is where the real skill lies.
8.1 The 30-Minute Rule
Time management is as critical as camera technique in group portrait photography — the timeline below visualizes why experienced photographers limit formal group setups to thirty minutes and eight to ten compositions during wedding and corporate events.
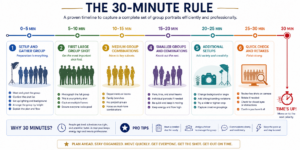
Use the timeline as a scheduling benchmark when building shot lists for family reunions or event coverage, and pair it with the directing techniques in section 8.3 to keep energy high throughout each portrait sequence.
“After 30 minutes of group portraiture, genuine smiles and patience start to fade. My terrible sense of humor can only keep people entertained for so long!”
Thirty minutes equals eight to ten formal photographs. That’s your limit. Plan accordingly.
“I don’t want to take the couple away from their guests for too long, so the quickest set-up that offers the best outcome is ideal.”
8.2 Pre-Shoot Briefing
Build rapport with the key subjects before the shoot. Understand what’s important to them. “This gives me the approach I need on the day, together with a concise list of images required. I’m all set to walk into a wedding with confidence.”
8.3 Directing Techniques
Be loud but friendly. Clear instructions keep things moving. Long explanations cause restlessness.
Use humor. “Tell terrible jokes and have guests laugh with you and sometimes at you. This is how you build trust and connection.”
The countdown method. Ask everyone to close their eyes and open them on the count of three. Fire multiple shots on the count. Repeat the process a few times.
Talk and interact. “Offer compliments, help parents stand well, give awkward dangling arms purpose.” Don’t hide behind the camera—be present.
8.4 Managing Difficult Subjects
Children: Photograph them first before they get tired. Use games and prompts: “Can you make mom spin?” “Who can race to that tree and back?”
Nervous subjects: Give them something to do. Hold a prop, rest hands on someone’s shoulder, or interact with another person.
Latecomers: Establish clear expectations ahead of time. If someone arrives late, you’re either re-shooting or excluding them. The group won’t thank the latecomer.
For the group as a whole: One photographer uses this technique: “Now, it’s good to recognize that having our picture taken is a stressful experience, and that reaction some of us have to this type of stress is that we can’t stop talking. If you are one of those people who has the urge to say something or crack a joke just as I am taking the picture, please do not do it. It ruins the picture.” The sincerity mixed with humor worked—people laughed and then focused.
8.5 The Nose Check
Pre-shoot: ask subjects to check their own and their partner’s face. “I can’t tell you how many hours I’ve spent in Lightroom cleaning up little noses (and big ones), fixing smudged eyeliner and removing lint from clothing.”
Have tissues and wet wipes on hand. A quick cleanup saves hours of retouching.
Professional Tip
“Be present in the moment. The best photos happen when you’re fully aware of what’s happening around you and in front of you.” You can’t direct effectively if you’re distracted by settings or gear. Know your equipment cold so you can focus on people.
Common Mistake
Taking too long. Fatigue shows in faces and body language. After thirty minutes, people start looking like they want to be anywhere else. Get what you need and move on.
9. Post-Production Workflow
User Question: What post-processing steps are essential for group portraits? Search Intent: Editing workflows and troubleshooting.
9.1 Head Swapping
Even perfect preparation cannot prevent every blink — the head swapping workflow diagram below outlines the post-production rescue that saves group portrait sessions when one subject ruins an otherwise flawless frame, a technique detailed further in our Photoshop retouching guide.
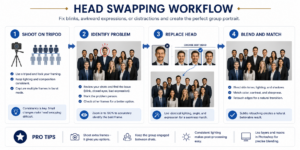
Follow the workflow steps in the diagram after every large wedding or corporate group session — combined with burst mode and the countdown directing method from section 8.3, head swapping turns unavoidable blinks into minor fixes rather than reshoots.
This is the single most useful post-production technique for group portraits. When your perfect image is ruined by one person blinking or making a weird face, you can replace their head from another frame.
The key: shoot on a tripod so all frames align. Then in Photoshop: copy the good head from the backup frame, paste it over the bad head in the hero frame, and blend the edges.
9.2 Batch Processing
Large groups generate many images. Apply consistent color correction across the entire set. Skin smoothing should be subtle—over-retouching makes everyone look plastic.
9.3 Color Consistency
Shoot RAW for maximum editing control. For black and white conversions, “I capture images in RAW and convert them to black and white in post-production.”
If you’re mixing light sources (ambient daylight + tungsten + flash), color balance becomes critical. Use gels on your flash (CTO—color temperature orange) to match ambient warmth.
9.4 Retouching Scale
Be realistic. Cleaning up blemishes and evening skin tones is expected. But don’t over-process. “If it’s emotional, the lack of color allows that emotional hit to be understood and felt quicker within your brain without the added color information processing.”
10. Troubleshooting Common Problems
User Question: What do I do when things go wrong during a group shoot? Search Intent: Problem-solving for common issues.
10.1 Closed Eyes
Use burst mode. Shoot multiple frames quickly. Use the countdown technique. Head swap in post-production.
10.2 Uneven Lighting
Check shadows before the final exposure. Adjust group position relative to the light source. Use fill flash or reflector to balance.
10.3 People Not Looking at Camera
Redirect with clear instructions. For large groups, use a helper to call attention. Sometimes, capture the distraction as a candid moment.
10.4 Crowd Control Issues
Have a helper round up people. Start with the largest group when everyone is present. “Be loud but friendly: clear instructions keep things moving.”
10.5 Space Constraints
Consider a panoramic composite if a single frame is impossible. Use a normal lens, pivot the camera parallel to the group, and shoot overlapping frames.
Frequently Asked Questions
FAQ Navigation
What aperture is best for group photos?
For groups in multiple rows, f/8 minimum; f/11 or f/16 for larger groups. For single rows, f/4 to f/5.6 may be sufficient. Always focus at the boundary between the first and second thirds of the group depth.
What lens is best for group portraits?
50mm is the safe choice with minimal distortion. 24-70mm zooms offer flexibility for varying group sizes. 85mm is excellent for smaller groups and separating subjects from the background.
How do I get everyone in focus?
Focus at the boundary between the first and second thirds of the group depth. Use a smaller aperture (higher f-number). Increase your distance from the group if possible. Use a tripod to enable slower shutter speeds.
How long should a group portrait session take?
Plan for 30 minutes maximum for formal group shots. After that, attention and smiles fade. This allows for 8-10 different compositions.
How do I prevent people from blinking?
Use burst mode to shoot multiple frames. Use a countdown where everyone closes eyes and opens on three. Head swaps in post-production.
What lighting is best for group photos?
Soft, even light. Open shade or overcast skies outdoors. Multiple light sources with modifiers for even coverage indoors. Avoid harsh midday sun and patchy light.
How do I pose large groups?
Use tiered levels—standing, kneeling, sitting. Place taller people in back. Build the group gradually rather than starting over for each shot. Use the triangle method to avoid stacked heads.
Professional Tips Summary
- Arrive 30 minutes early for setup—preparation is what makes the shoot possible.
- Start with the largest group first when energy is highest.
- Build the group gradually rather than starting over for each shot.
- Focus at one-third depth into the group.
- The 30-minute rule limits you to 8-10 formal setups.
- Use burst mode for closed-eye prevention.
- Use humor to relax subjects and create natural expressions.
- Check noses and clothing before shooting to save hours of retouching.
- Use a tripod for consistent framing enabling head swaps.
- Scout locations in advance to understand lighting and space constraints.
Common Mistakes Summary
- Arranging people in a straight line—creates a boring, police-lineup effect.
- Focusing on the front or back row instead of the optimal one-third point.
- Taking too long—fatigue shows in expressions.
- Choosing complex backgrounds that compete with subjects.
- Forgetting to check for closed eyes or awkward expressions in real time.
- Insufficient aperture for multiple rows.
- Poor communication before the shoot—people don’t know what to wear or expect.
- Not having a backup plan for weather or lighting changes.
Conclusion: Make Them Count
The dos and don’ts checklist below distills every major lesson from this guide — preparation, posing, lighting, camera settings, and client direction — into a single reference you can review before any wedding, family reunion, or corporate team shoot.

Keep the checklist visible when planning your next group portrait assignment, and revisit the linked sections on depth of field and studio lighting whenever you need a deeper dive into the technical foundations summarized above.
Group portrait photography is a different beast from individual portraiture. The technical demands are higher—tighter apertures, careful lighting, precise focus placement. The people management is harder—you’re directing multiple personalities with different attention spans. The stakes feel bigger—everyone in the image needs to look good.
But with preparation, practice, and a system, you can walk into any corporate or family group shoot with confidence. Scout the location. Communicate the plan. Arrive early. Work quickly. Stay relaxed. Connect with your subjects. Get it right in camera.
And when you don’t get it quite right, know that your post-production workflow can save you. Head swaps, color grading, and batch processing are powerful tools in the digital era.
The images you create matter. They’ll sit on mantelpieces, in corporate lobbies, in family albums. They’ll outlast the moment. As Santos says: “These photographs are valuable and become more valuable in time.”
Make them count.


