Video Photo Studio
  • Video Studio
  • Photography Studio
  • Production
    • Podcast / Interview Rec
    • Green Screen Production
    • Business Headshot
    • Actor Headshot
    • Artist Headshot
    • Musician Headshots
    • Commercial shoot
    • Interior shoot
Posted on 25 Jul at 9:00 pm

Night Landscape Photography: City Lights, Fireworks, Lightning & Professional Workflow

Skip to contents

Master professional night landscape photography with expert techniques for city lights, fireworks, lightning, light painting, editing workflows, and commercial applications. Learn how professionals consistently create stunning night images.

Night Landscape Photography — City Lights, Fireworks, Lighting Techniques, and the Complete Workflow

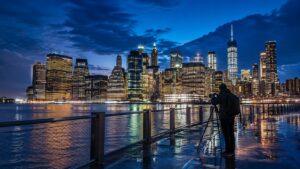
Night city skyline during blue hour with illuminated buildings, deep blue twilight sky, and balanced natural and artificial light
Night city skyline during blue hour: the transitional period after sunset when artificial lights and deep blue sky create the most balanced urban night photographs.

Key Takeaways

  • City and event photography at night rewards planning and patience more than fast reflexes.
  • Foreground lighting should guide the viewer, not flood the scene — restraint separates professional results from amateur ones.
  • Post-processing at night follows the same logic darkroom printing always did: reveal the atmosphere, don’t fabricate it.
  • A repeatable field and editing workflow is what makes professional results consistent, not luck.
  • Night photography has real commercial applications across hospitality, tourism, real estate, and outdoor brands.

Frequently Asked Questions

  • Best time for night photography?
  • Do I need a full-frame camera?
  • Should I always use a tripod?
  • Is autofocus reliable at night?
  • Why do my night photos look noisy?
  • How do professionals achieve sharp night photographs?
  • Is post-processing part of professional photography?
  • Can weather improve night photography?

Table of Contents

  • Introduction
  • How Do Professionals Photograph Cities at Night?
    • The Best Night Photograph Usually Isn’t Taken at Night
    • Look for Reflections Before Looking at Buildings
    • Light Trails Add Movement Without Creating Chaos
    • Mixed Lighting Requires Creative Decisions
    • Keep the Horizon Level
    • Don’t Ignore the Foreground
    • Professional Workflow: Photographing a Downtown Skyline
  • How Do You Capture Fireworks and Lightning?
    • Prepare Before the First Firework
    • Manual Focus Prevents Missed Frames
    • Composition Is More Important Than Individual Explosions
    • Exposure Is Easier Than Most People Expect
    • Photographing Lightning Requires Patience
    • Smoke Changes Fireworks Photography
    • Common Mistakes During Fireworks Photography
    • Professional Workflow: Photographing an Independence Day Celebration
  • When Should You Add Foreground Lighting?
    • Darkness Is Part of the Composition
    • Decide Whether the Foreground Actually Needs Light
    • Light Painting Offers Complete Creative Control
    • Portable LED Lights Produce More Predictable Results
    • Flash Is Sometimes the Better Choice
    • Vehicle Headlights and Existing Light Sources
    • Avoid the Most Common Lighting Mistakes
    • Professional Workflow: Light Painting a Desert Landscape
  • How Do You Process Night Landscape Photos?
    • Begin With Exposure Balance
    • Noise Reduction Should Preserve Detail
    • White Balance Establishes Atmosphere
    • Local Adjustments Guide the Viewer
    • Sharpen Last
    • Build a Repeatable Editing Workflow
  • Professional Workflow for Night Landscape Photography
    • Step 1: Research the Location
    • Step 2: Arrive Early
    • Step 3: Capture Variations
    • Step 4: Verify Before Leaving
    • Step 5: Protect Your Files
  • Professional Tips for Better Night Landscape Photography
    • Arrive Earlier Than You Think You Need To
    • Photograph the Same Scene More Than Once
    • Learn to Read Weather Instead of Avoiding It
    • Simplify the Composition
    • Review Images Critically in the Field
    • Keep Your Eyes Adapted to Darkness
    • Respect the Environment
  • Common Mistakes in Night Landscape Photography
    • Arriving Too Late
    • Ignoring Composition While Chasing Technical Settings
    • Raising ISO Too Quickly
    • Overprocessing RAW Files
    • Ignoring Foreground Interest
    • Leaving Too Soon
  • Commercial Case Studies
    • Luxury Hospitality
    • Tourism Marketing
    • Real Estate and Architecture
    • Outdoor Brands
  • Frequently Asked Questions
  • Conclusion

↑ Back to top


Introduction

This is the second half of a guide to night landscape photography. Part 1 covered why night photography demands a different mindset than daytime shooting, how to prepare before you ever leave home, the camera settings that consistently produce strong results, and how to photograph moonlit landscapes with intention. If you haven’t read that part yet, it’s worth starting there, since the core principles — reading light, protecting highlights, trusting the histogram, and planning around conditions instead of hoping for them — carry directly into everything below.

This part turns to three of night photography’s most demanding subjects: cities, fireworks, and lightning. From there, it covers how and when to add your own light to a scene, a complete post-processing workflow for night images, and the field habits that separate consistent professional results from one-off lucky shots. It closes with the mistakes to watch for and a look at where this kind of photography shows up commercially.

↑ Back to Table of Contents


How Do Professionals Photograph Cities at Night?

City skylines have fascinated photographers for more than a century. As daylight fades, familiar buildings are transformed by thousands of individual light sources — glass towers reflect the last color in the sky, headlights trace bright lines through intersections, and illuminated windows create rhythm across the skyline.

Modern digital cameras have made night photography significantly easier than it was during the film era, but the creative principles haven’t changed much. Great city photographs rarely come from expensive equipment alone; they come from careful planning, patience, and an understanding of how urban light changes through the evening. Professional architectural and commercial photographers rarely show up after dark hoping to find a good composition — instead, they plan the shoot around the transition from daylight to darkness, when the balance between natural and artificial light is at its most beautiful.

The Best Night Photograph Usually Isn’t Taken at Night

One of the biggest surprises for beginning photographers is that the strongest city images are rarely captured in complete darkness. The period roughly 20 to 40 minutes after sunset, often called blue hour, produces the most balanced lighting conditions. During this short window, the sky still holds deep blue tones while artificial lights have already come on.

This creates several advantages: buildings stay separated from the background instead of becoming black silhouettes, glass facades reflect subtle color, streetlights appear bright without overwhelming the exposure, and clouds retain texture instead of disappearing into darkness. The result is a photograph with significantly more depth than one taken several hours later. Experienced commercial photographers often arrive at least an hour before sunset, since this brief window passes quickly and missing it usually means waiting until the next evening.

Look for Reflections Before Looking at Buildings

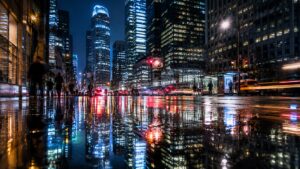
City skyline reflections in wet pavement after rain at night, doubling illuminated buildings and streetlights in symmetrical composition
City reflections after rainfall: wet streets and puddles mirror illuminated skylines, creating symmetry and foreground depth for urban night landscapes.

Many photographers immediately point their camera at the tallest skyscraper. Professionals often do the opposite, searching for reflections first. Rain transforms ordinary streets into enormous mirrors, rivers double the visual impact of illuminated skylines, modern office buildings reflect neighboring architecture, and glass bus shelters create unexpected framing opportunities. Even small puddles can produce dramatic foreground interest when photographed from a low camera position.

Reflections introduce symmetry while helping guide the viewer through the composition. Instead of photographing a building alone, you end up photographing the relationship between the building and its environment.

Light Trails Add Movement Without Creating Chaos

Traffic is one of the defining features of modern cities. Rather than avoiding moving vehicles, experienced photographers use them to introduce motion into otherwise static compositions. Long shutter speeds turn headlights into continuous lines that naturally guide the eye through the frame, becoming compositional elements rather than distractions.

Successful traffic photography depends on observation. Rather than photographing every passing car, professionals wait until traffic patterns create balanced visual flow — too few vehicles leave empty roads, while too many create bright, overlapping streaks that overwhelm the architecture. Patience usually produces cleaner compositions than simply firing off dozens of random exposures.

Mixed Lighting Requires Creative Decisions

Urban environments rarely contain a single color of light. A single city block might include warm interior office lighting, cool LED streetlights, decorative architectural lighting, advertising displays, vehicle headlights, illuminated signs, and reflections from neighboring buildings. Many beginners try to neutralize every color temperature during editing, but professional photographers usually preserve some variation, since warm and cool light naturally separate different parts of the image. That subtle contrast creates atmosphere and helps establish visual hierarchy. The objective isn’t technical perfection — it’s an image that feels authentic to the location.

Keep the Horizon Level

Architectural photography leaves very little room for technical mistakes. A slightly crooked horizon that might go unnoticed in a mountain landscape becomes immediately obvious in an urban skyline, and leaning vertical lines caused by tilting the camera upward can make expensive buildings look unstable. Professional photographers carefully level the tripod before composing and, whenever possible, avoid excessive upward camera angles that exaggerate perspective distortion. Correcting these issues in post-processing is possible, but it often requires cropping away valuable parts of the frame — getting the geometry right during capture almost always produces better results.

Don’t Ignore the Foreground

Many skyline photographs fail because the foreground contributes nothing. An impressive skyline alone rarely creates a memorable composition, so professionals look for elements that add depth — bridges, waterfront railings, boats, pedestrians, park pathways, sculptures, fountains, or leading road markings. Foreground elements provide visual context while naturally leading the viewer toward the main subject.

Professional Workflow: Photographing a Downtown Skyline

Flowchart diagram of professional workflow for city night photography from arrival and scouting through blue hour capture and final exposure review
Professional city night photography workflow: arrive early, scout reflections, compose at blue hour, capture variations, and review the histogram before leaving.

Imagine photographing Lower Manhattan from Brooklyn Bridge Park. You arrive ninety minutes before sunset and, rather than immediately setting up the tripod, spend time walking the waterfront. You observe where reflections appear strongest as the tide changes, note which buildings receive the first interior illumination, and identify pedestrian traffic patterns to avoid crowded compositions.

By the time blue hour arrives, you’ve already chosen your final camera position, leveled the tripod, and finalized the composition — the only remaining variable is light. Over the next thirty minutes, you capture several variations as the skyline gradually transforms, and by the time darkness fully sets in, the most successful photograph has likely already been made.

This deliberate workflow is common among professional architectural photographers. Instead of reacting to changing conditions, they anticipate them.

Professional Tip: Some of the strongest city photographs are captured immediately after rainfall. Wet pavement reflects artificial light, increasing contrast, depth, and visual interest without requiring any additional equipment.

See also: Post-processing for city photography · Landscape composition · Blue hour photography · Professional workflow

↑ Back to Table of Contents


How Do You Capture Fireworks and Lightning?

Fireworks and lightning are among the least predictable subjects in photography. Unlike architecture or landscapes, they can’t be repositioned or repeated on demand, so success depends on preparation, anticipation, and consistency rather than fast reflexes. Professional photographers simplify every possible variable before the event begins so they can focus entirely on timing.

Prepare Before the First Firework

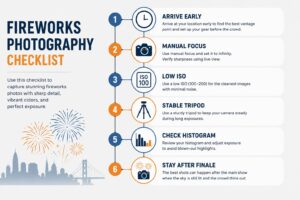
Many photographers wait until fireworks begin before setting up their equipment, and by then valuable opportunities have already passed. Experienced photographers arrive early enough to choose a stable shooting position, determine wind direction, identify foreground subjects, evaluate background distractions, compose the scene, and establish focus. When the first shells launch, the camera should already be ready.

Manual Focus Prevents Missed Frames

Autofocus performs poorly once fireworks begin, since smoke, darkness, and rapidly changing light confuse focusing systems. Instead, professionals establish focus before the show starts, using a distant building, bridge, or bright light as a reference point, then switch the lens to manual focus so the camera doesn’t try to refocus between exposures.

Composition Is More Important Than Individual Explosions

A spectacular firework filling the entire frame often becomes visually repetitive. Professional photographers instead photograph the relationship between fireworks and their surroundings, including recognizable landmarks — city skylines, bridges, monuments, lakes, waterfronts, historic buildings — that create scale. These elements turn fireworks from isolated bursts of color into a complete visual story.

Exposure Is Easier Than Most People Expect

Fireworks are extremely bright and the surrounding landscape is comparatively dark. Rather than dramatically raising ISO, photographers generally keep ISO as low as practical while leaving the shutter open long enough to record multiple bursts. Long exposures also preserve ambient city light and reflections, producing richer images than very short shutter speeds. Reviewing the histogram after a few test exposures helps keep highlights under control.

Photographing Lightning Requires Patience

Lightning presents a different challenge, since no photographer can predict exactly where the next strike will land. Professionals compose the scene first and let time work in their favor — a stable tripod, remote shutter release, and extended exposure dramatically increase the odds of capturing a strike. Just as important is knowing when not to photograph: no image is worth standing in an exposed location during severe weather. Safe shelter should always come before equipment or composition.

Smoke Changes Fireworks Photography

As a fireworks show continues, smoke gradually accumulates. Many photographers keep shooting from the same position even as visibility drops, but professionals continuously reassess conditions — sometimes moving just a few yards changes the relationship between smoke and wind enough to restore a clear view. Staying flexible often produces stronger results than staying loyal to the original composition.

Common Mistakes During Fireworks Photography

The most common mistakes include raising ISO unnecessarily, using autofocus throughout the display, changing composition after every explosion, cropping too tightly around individual fireworks, ignoring foreground elements, and leaving right after the finale instead of photographing the lingering smoke and illuminated city lights. Recognizing these mistakes before arriving on location dramatically improves consistency.

Professional Workflow: Photographing an Independence Day Celebration

Fireworks photography checklist infographic covering early setup, manual focus, composition with landmarks, low ISO long exposure, and post-finale shooting
Fireworks photography checklist: prepare before the first shell, lock manual focus, compose with landmarks, use low ISO and long shutter speeds, and keep shooting after the finale.

For a commercial tourism assignment, preparation begins long before the fireworks start. Several days earlier, you scout multiple viewpoints and compare how bridges, waterfront buildings, and open sky align within the frame, and you check wind forecasts, since drifting smoke can completely change the quality of the images.

On the day of the event, you arrive early enough to secure the planned shooting position before crowds gather. With the composition established, you capture a series of blue hour photographs while the skyline still holds color — images that often stand on their own and provide a visual baseline before the fireworks begin.

Once the display starts, you avoid chasing individual explosions. Instead, you hold the composition and let different bursts interact naturally with the skyline, periodically checking the histogram and adjusting only when changing smoke conditions or brighter shells require it. After the grand finale, you keep shooting for several minutes — the illuminated skyline, drifting smoke, and remaining reflections frequently produce some of the most atmospheric images of the evening.

The final gallery tells a complete story rather than documenting isolated moments. That narrative approach is one of the things that separates professional commercial photography from simple event coverage.

See also: Camera settings · Long exposure photography · Tripod guide · Post-processing

↑ Back to Table of Contents


When Should You Add Foreground Lighting?

One of the defining characteristics of exceptional night landscape photography is the ability to guide the viewer’s eye through darkness without destroying the natural atmosphere of the scene. Foreground lighting can do exactly that — but only when used with restraint.

The idea of illuminating nearby objects during long exposures goes back to the film era, and while digital cameras, compact LED lights, and portable flash systems now give photographers far more creative control than was possible then, the artistic principle hasn’t changed. The purpose of foreground lighting isn’t to make the scene brighter — it’s to help the viewer understand the landscape.

Decision tree diagram for foreground lighting in night landscape photography showing when to use natural light, light painting, LED panels, flash, or existing sources
Foreground lighting decision tree: evaluate whether the scene needs artificial light, then choose light painting, continuous LED, flash, or existing ambient sources with restraint.

Darkness Is Part of the Composition

Many photographers believe every part of the image should be visible. Professional landscape photographers often pursue the opposite goal: darkness creates mystery, establishes mood, separates subjects, and directs attention toward the brightest parts of the frame. If every rock, tree, and bush receives equal illumination, the viewer no longer knows where to look. Instead of revealing everything, experienced photographers illuminate only the foreground elements that strengthen the composition — a weathered tree standing alone, a single rock beside the shoreline, a winding hiking trail leading toward distant mountains — while letting the rest of the frame stay naturally dark.

Decide Whether the Foreground Actually Needs Light

Before reaching for a flashlight or LED panel, ask a simple question: would this composition still work without additional lighting? Many moonlit landscapes already contain enough subtle illumination — snow reflects moonlight remarkably well, sand dunes often need no artificial light at all, and wet rocks may naturally catch enough reflected light to create separation. Adding unnecessary illumination often reduces realism instead of improving the image. Professional photographers rarely add light simply because they can; they add it only when the composition genuinely benefits.

Light Painting Offers Complete Creative Control

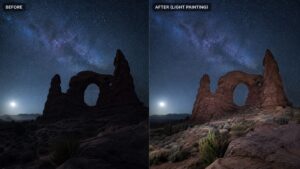
Before and after comparison of light painting technique on night landscape foreground rocks showing subtle illumination versus unlit natural moonlight scene
Light painting before and after: a brief flashlight pass during a long exposure adds gentle foreground separation without revealing the lighting technique.

Light painting remains one of the most versatile techniques in night landscape photography. Rather than leaving a continuous light source in one position, the photographer briefly moves a flashlight or LED wand across selected foreground subjects during a long exposure, creating soft, even illumination that resembles natural light far more effectively than a direct flash.

Successful light painting requires subtle movement — too slow creates bright hotspots, too fast leaves parts of the scene underexposed. Experienced photographers often practice several passes before making the final exposure, since small adjustments in speed, distance, and beam angle dramatically change the appearance of the finished photograph.

Portable LED Lights Produce More Predictable Results

Modern LED panels have become essential tools for many commercial landscape photographers. Unlike flash, continuous lighting lets you see exactly how shadows and highlights interact before pressing the shutter, which makes it easier to maintain consistency across multiple exposures. Bi-color LED lights add further flexibility — a slightly warmer setting may complement sandstone cliffs or historic buildings, while a cooler setting often blends more naturally with moonlit snow or granite landscapes. Matching artificial light to the existing environment creates a photograph that feels intentional rather than artificially lit.

Flash Is Sometimes the Better Choice

Although continuous lighting dominates modern landscape photography, flash remains useful in specific situations: freezing foreground vegetation during windy conditions, adding subtle illumination to nearby rock formations, balancing bright urban backgrounds, or photographing people within night landscapes. The key is moderation — powerful flash output rarely looks convincing outdoors, and reducing flash power while diffusing the light generally produces a far more natural result. The viewer should notice the subject, not the lighting technique.

Vehicle Headlights and Existing Light Sources

Artificial lighting doesn’t always need to come from photography equipment. Many professionals creatively incorporate existing light — vehicle headlights can softly illuminate desert roads, a nearby campsite may provide gentle foreground warmth, and the windows of a mountain cabin naturally attract attention without additional lighting. Using available light often creates images that feel more authentic, since every light source belongs naturally within the scene.

Avoid the Most Common Lighting Mistakes

Artificial lighting quickly becomes distracting when used carelessly. The most frequent mistakes include lighting every object equally, creating multiple competing shadows, using excessively cool or excessively warm light, positioning the light source too close to the subject, and letting the foreground become brighter than the landscape itself. The strongest foreground lighting is often the lighting viewers never consciously notice.

Professional Workflow: Light Painting a Desert Landscape

Imagine photographing sandstone formations beneath a clear desert sky. The composition is already strong — moonlight gently outlines the cliffs — but the foreground lacks enough separation to guide the viewer toward the main subject. Rather than flooding the area with bright artificial light, you briefly illuminate only the nearest rock formation during a thirty-second exposure, keeping the flashlight moving continuously so it never lingers in one spot long enough to create harsh shadows.

After reviewing the image, you notice one edge is slightly brighter than intended, so on the next exposure you shorten the illumination by two seconds. That small adjustment creates a balanced photograph where the foreground naturally leads toward the illuminated cliffs without revealing the lighting technique itself — a good illustration of an important principle in professional photography: artificial light should support the landscape, not become the subject.

See also: Light painting techniques · Moon photography planning · Landscape photography gear

↑ Back to Table of Contents


How Do You Process Night Landscape Photos?

The camera captures the raw material; post-processing turns that capture into the final photograph. That’s always been true. During the film era, photographers shaped their images in the darkroom through careful development, contrast control, and selective printing. Today’s digital workflow uses different tools, but the objective is identical: accurately communicate the atmosphere experienced on location.

Professional editing begins with restraint. The goal isn’t to create a dramatic image at any cost — it’s to preserve the feeling of standing in that landscape after sunset.

Begin With Exposure Balance

Night photographs often contain extreme brightness differences — streetlights, illuminated windows, reflections, and signs may be several stops brighter than the surrounding landscape. Instead of immediately lifting every shadow, experienced editors evaluate the entire tonal range, usually addressing highlights first. Recovering clipped highlights preserves detail in buildings, clouds, and reflections while preventing artificial-looking halos. Only after highlights are under control do professionals gradually open up the darker portions of the image — a sequence that generally produces more natural tonal transitions.

Noise Reduction Should Preserve Detail

Every digital camera produces some noise during long exposures. Modern software removes it remarkably well, but excessive noise reduction creates a different problem: fine textures disappear, stone starts to look plastic, trees lose definition, and stars begin to resemble soft dots instead of sharp points. Professional editors aim for balance, reducing visible noise while preserving natural texture, since some grain is expected in night photography — viewers rarely object to subtle noise, but they immediately notice artificial smoothing.

White Balance Establishes Atmosphere

Color temperature strongly influences emotional response. A cool blue night suggests calmness, warm city lights communicate energy, and neutral color often removes both. Many beginners try to eliminate every color cast, but professionals usually preserve these color relationships instead — the cool tone of moonlight becomes more believable when contrasted with the warm glow of distant buildings or campfires. Editing should strengthen those natural differences rather than average them into uniform neutrality.

Local Adjustments Guide the Viewer

Global adjustments improve the entire image; local adjustments improve the storytelling. Selective dodging and burning remain as valuable today as they were in traditional darkrooms. Small localized changes can draw attention toward the main subject, soften distracting highlights, increase texture in foreground rocks, enhance reflections, or subtly brighten leading lines — and these adjustments should remain invisible. The viewer should notice the composition, not the editing.

Sharpen Last

Sharpening should always be one of the final editing steps. Applying it before resizing or exporting often exaggerates noise and creates unwanted halos around bright light sources. Professionals tailor sharpening to the intended output — a large gallery print requires different sharpening than a photo viewed on a smartphone. The objective is consistent clarity, not maximum sharpness.

Build a Repeatable Editing Workflow

Diagram of professional night photo editing workflow from RAW import through exposure balance, noise reduction, local adjustments, sharpening, and export
Professional night editing workflow: balance highlights first, preserve texture during noise reduction, apply invisible local adjustments, and sharpen last for final output.

Consistency is one of the defining characteristics of professional work. Instead of inventing a new editing process for every photograph, experienced photographers follow a repeatable sequence: import and organize the RAW files, select the strongest compositions, correct lens distortion and chromatic aberration, balance exposure, adjust white balance, recover highlights and shadows, reduce noise, apply local adjustments, sharpen for final output, and export separate versions for print, web, and social media. A structured workflow saves time while keeping image quality consistent across an entire assignment.

See also: Editing workflow · Camera settings for landscape photography · Landscape photography tips

↑ Back to Table of Contents


Professional Workflow for Night Landscape Photography

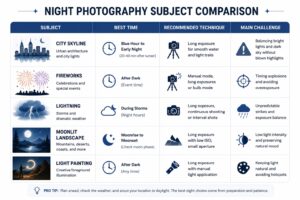
Comparison table of night photography subjects including cities, fireworks, moonlit landscapes, and light painting with planning difficulty and key techniques
Night photography subject comparison: cities, fireworks, foreground lighting, and editing each demand different planning, exposure, and post-processing approaches.

Outstanding night photographs rarely result from a single well-timed exposure. They’re usually the product of careful planning, disciplined fieldwork, and methodical post-production. Professional photographers approach every assignment as a complete workflow rather than a collection of individual camera settings.

Step 1: Research the Location

Preparation begins long before leaving home, and includes satellite imagery, topographic maps, sunrise and sunset times, moon phase, weather forecasts, cloud movement, access restrictions, parking, permits, and safety considerations. Knowing what to expect lets you spend more time photographing and less time solving avoidable problems in the field.

Step 2: Arrive Early

Professional photographers consistently arrive well before the light becomes interesting. Early arrival gives you time to walk the location, evaluate compositions, identify foreground subjects, prepare your equipment, and adapt to changing conditions. The strongest image is often the result of careful observation rather than fast camera operation.

Step 3: Capture Variations

Never assume your first successful exposure is the best one. Professionals routinely create multiple versions by changing camera height, focal length, foreground emphasis, shutter speed, lighting, and composition. Small adjustments often produce dramatically stronger photographs.

Step 4: Verify Before Leaving

Before packing up, carefully review the critical images — check focus, the histogram, highlight clipping, foreground detail, dust spots, and unwanted distractions. Returning home only to discover every exposure is slightly out of focus is one of the most frustrating, and avoidable, mistakes in landscape photography.

Step 5: Protect Your Files

The assignment isn’t complete when the shutter closes — it’s complete when the photographs exist safely in multiple locations. Professional photographers back up memory cards immediately after returning from the field and keep at least two independent copies before formatting any storage media. The effort invested in creating a memorable night landscape deserves the same level of protection as any other professional project.

Professional Tip: Treat every night photography session as a complete production rather than a single exposure. The best commercial landscape photographers devote as much attention to planning, organization, and post-processing as they do to camera settings. Consistent results come from a repeatable workflow, not luck.

See also: Best time of day for landscape photography · Planning before shooting · Conclusion

↑ Back to Table of Contents


Professional Tips for Better Night Landscape Photography

Technical knowledge is essential, but experience teaches lessons that rarely show up in camera manuals. Over years of photographing coastlines, mountains, deserts, forests, and city skylines after sunset, professional photographers develop habits that consistently improve both efficiency and image quality. The recommendations below are practical techniques that can save time in the field and help produce stronger photographs under challenging conditions.

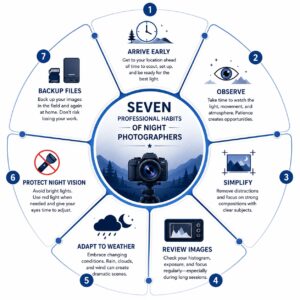
Infographic listing seven professional habits of night photographers including early arrival, patience, weather reading, simplified composition, field review, dark adaptation, and environmental respect
Seven professional night photography habits: arrive early, photograph the same scene multiple times, read weather, simplify composition, review in the field, protect night vision, and respect locations.

Arrive Earlier Than You Think You Need To

Many photographers plan to arrive at sunset; professionals often arrive 60 to 90 minutes earlier. That extra time lets you explore several compositions instead of settling for the first one, identify foreground elements that may disappear in darkness, assemble equipment without rushing, monitor changing weather, figure out where artificial lights will appear, and evaluate safety hazards. The less you have to think about logistics after sunset, the more attention you can give to creativity.

Photograph the Same Scene More Than Once

Night landscapes constantly evolve — clouds move, city lights switch on, fog drifts across valleys, and reflections change as wind rises or dies down. Instead of treating every location as a single photograph, professionals often stay in one place for an hour or longer and let the scene transform naturally. Many portfolio images result from patience rather than movement.

Learn to Read Weather Instead of Avoiding It

Beginning photographers often put off night photography whenever conditions seem less than ideal. Professionals understand that dramatic weather frequently produces the strongest photographs — light fog softening city lights, thin clouds surrounding the moon, recent rainfall producing reflections, incoming storms creating dramatic skies, or sea mist adding atmospheric depth. Completely clear skies can certainly produce beautiful photographs, but they’re not automatically the best conditions.

Simplify the Composition

Darkness naturally removes distractions — use that to your advantage. Ask yourself: What is the primary subject? Is every illuminated object helping the composition? Would removing one bright light improve visual balance? Does the foreground strengthen or weaken the scene? Every element inside the frame should have a purpose. Professional landscape photography is often an exercise in subtraction rather than addition.

Review Images Critically in the Field

Don’t wait until you get home. Zoom into important images and check critical focus, motion blur, clipped highlights, distracting reflections, unwanted people, dust spots, and tripod vibration. Spending thirty seconds reviewing an image on location can save an entire evening’s work from being wasted.

Keep Your Eyes Adapted to Darkness

Human vision gradually adapts after sunset, and repeatedly checking a bright phone screen destroys that adaptation. Many professionals reduce screen brightness or switch on a red-light mode while working outdoors. Preserving night vision makes it easier to move safely, spot compositions, and evaluate changing light.

Respect the Environment

Landscape photography carries responsibility. Avoid trampling vegetation, stay on established trails whenever possible, never disturb wildlife just to improve a composition, and pack out everything you bring. Exceptional photographs should never come at the expense of the locations that inspired them.

↑ Back to Table of Contents


Common Mistakes in Night Landscape Photography

Every photographer makes mistakes, but most night photography problems follow predictable patterns. Recognizing them early dramatically shortens the learning curve.

Arriving Too Late

Perhaps the most common mistake. Many photographers miss the best light because they show up after darkness has already fallen. Blue hour lasts only a short time, so preparation has to begin well before sunset.

Ignoring Composition While Chasing Technical Settings

Many beginners spend more time adjusting ISO than evaluating composition, but a technically perfect exposure can’t rescue a weak composition. Professionals almost always settle on composition before making significant exposure adjustments.

Raising ISO Too Quickly

High ISO is often used unnecessarily. If the landscape isn’t moving, extending the shutter speed generally produces cleaner results than raising ISO. Noise reduction software keeps improving, but preserving image quality during capture is still preferable.

Overprocessing RAW Files

Modern editing software provides extraordinary creative freedom, which sometimes leads to unrealistic results — excessive clarity, oversaturated skies, unnatural blue shadows, halos around buildings, aggressive sharpening, or excessive HDR effects. The strongest night photographs usually look believable rather than heavily processed.

Ignoring Foreground Interest

Beautiful stars alone rarely create memorable landscape photographs, and a city skyline without foreground depth often feels flat. Foreground elements establish scale while helping guide the viewer through the frame.

Leaving Too Soon

Many photographers pack up immediately after the “main event,” but professionals often stick around. After fireworks end, after rain stops, after the moon rises, after clouds begin moving — some of the evening’s strongest photographs may still be waiting.

↑ Back to Table of Contents


Commercial Case Studies

Professional landscape photography extends far beyond personal artistic projects. Many industries rely on high-quality nighttime imagery to communicate atmosphere, luxury, adventure, or architectural excellence, and understanding these applications can help photographers recognize commercial opportunities.

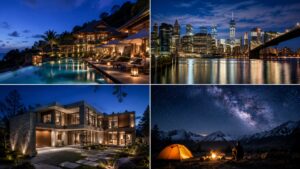
Collage showing commercial applications of night landscape photography across luxury hospitality, tourism marketing, real estate twilight, and outdoor brand advertising
Commercial applications of night landscape photography: hospitality resorts, tourism campaigns, twilight real estate, and outdoor adventure brands rely on atmospheric night imagery.

Luxury Hospitality

Luxury resorts frequently commission photographers to capture their properties after sunset. Swimming pools, architectural lighting, restaurants, and surrounding landscapes often appear significantly more inviting during blue hour than in full daylight. Successful hospitality photography balances architectural detail with emotional atmosphere.

Tourism Marketing

Destination marketing organizations rely heavily on nighttime imagery. Historic districts, waterfronts, festivals, national parks, and scenic overlooks all benefit from photographs that communicate experience rather than simple documentation. Visitors don’t purchase destinations — they purchase emotions, and night photography excels at creating those emotional connections.

Real Estate and Architecture

High-end residential and commercial properties are commonly photographed during twilight. Balanced interior lighting combined with rich evening skies creates significantly stronger marketing materials than midday photography, and architectural photographers carefully coordinate interior lighting, exterior exposure, and weather to maximize visual appeal.

Outdoor Brands

Manufacturers of camping equipment, adventure clothing, off-road vehicles, and outdoor accessories frequently incorporate night landscapes into advertising campaigns. Images of illuminated tents beneath the stars, hikers carrying headlamps, or mountain cabins under moonlight communicate exploration and adventure more effectively than product photographs alone.

↑ Back to Table of Contents


Frequently Asked Questions

What is the best time to photograph night landscapes?
The most productive period often begins during blue hour and continues through the first several hours of darkness. Blue hour provides the best balance between natural ambient light and artificial illumination, while later hours may be preferable for moon photography, stars, or long-exposure city photography.
Do I need a full-frame camera for night photography?
No. Full-frame cameras generally offer better high-ISO performance and dynamic range, but excellent night landscape photographs can be made with APS-C and Micro Four Thirds cameras when exposure is carefully managed and a tripod is used.
Should I always use a tripod?
For most night landscapes, yes. A sturdy tripod allows lower ISO settings, longer exposures, and consistently sharper images, and it encourages slower, more deliberate composition.
Is autofocus reliable at night?
Modern autofocus systems have improved significantly, but manual focus remains the preferred choice in extremely dark conditions, particularly for landscapes, stars, and moonlit scenes.
Why do my night photos look noisy?
Noise usually results from one or more of the following: unnecessarily high ISO, underexposure, excessive shadow recovery during editing, or long exposures combined with sensor heat. Correct exposure and thoughtful post-processing generally reduce visible noise more effectively than relying on aggressive software corrections.
How do professionals achieve sharp night photographs?
Sharpness comes from combining several practices: a stable tripod, a remote shutter release or self-timer, accurate manual focus, an appropriate aperture, avoiding unnecessary ISO increases, and reviewing images carefully before leaving the location. No single camera setting guarantees sharpness — consistency comes from the entire workflow.
Is post-processing considered part of professional photography?
Absolutely. Digital post-processing serves the same purpose darkroom techniques served during the film era. The objective isn’t to fabricate reality, but to faithfully reproduce the atmosphere experienced on location while presenting the photograph in its strongest visual form.
Can weather improve night photography?
Very often. Thin clouds, fog, mist, recent rainfall, and even approaching storms can introduce reflections, atmospheric depth, and dramatic lighting that clear skies can’t provide. Learning to work with changing weather is one of the defining characteristics of experienced landscape photographers.

↑ Back to Table of Contents


Conclusion

Night landscape photography rewards patience more than speed. Modern cameras have dramatically simplified exposure, but they haven’t replaced the qualities that define outstanding photography: careful observation, thoughtful composition, and an understanding of light.

Every successful image begins with preparation. Researching the location, arriving early, studying weather conditions, and settling on a strong composition matter far more than memorizing camera settings. The technical aspects of night photography — exposure, focus, noise control, post-processing — are tools rather than objectives; their purpose is to support the photographer’s vision, not replace it.

Perhaps the most important lesson, covered across both parts of this guide, is that darkness should never be treated as an obstacle. It’s another creative element, just as valuable as color, texture, or perspective — shadows create mystery, artificial lights establish mood, reflections add depth, and long exposures reveal movement our eyes can’t perceive.

Whether you’re photographing moonlit mountains, dramatic coastlines, illuminated skylines, fireworks, or quiet forest trails, the same principles apply: slow down, observe carefully, and let the changing light shape the story. The most memorable night landscapes are rarely captured by chance — they’re created through preparation, patience, technical understanding, and the willingness to return to the same location until light, weather, and composition come together in a single frame.

↑ Back to Table of Contents


Related Reading

  • Landscape Composition
  • Golden Hour Guide
  • Blue Hour Photography
  • Landscape Camera Settings
  • Long Exposure Guide
  • Hyperfocal Distance
  • ND Filters
  • Weather for Landscape Photography
  • Landscape Photography Checklist
← Part 1
Night Landscape Photography:
Moonlight, Camera Settings and Planning

Next →
Landscape Photography Composition

↑ Back to Top← Previous Article

Next Article →

Related Articles


Night Landscape Photography: City Lights, Fireworks, Lightning & Professional Workflow
Previous Post
Night Landscape Photography: Camera Settings, Moonlight & Pro Tips
Next Post
The Complete Guide to Group Portrait Photography: Posing, Lighting & Camera Settings

The Complete Guide to Group Portrait Photography: Posin…

3 weeks ago
Night Landscape Photography: Camera Settings, Moonlight & Pro Tips

Night Landscape Photography: Camera Settings, Moonlight…

4 weeks ago
Landscape Photography Composition: Professional Techniques for Better Photos

What Time of Day Produces the Best Landscape Photos? A…

1 month ago
Let’s Connect
Facebook
Twitter
Pinterest
Instagram
Telegram
37 West 26th st. NYC, NY 10010
gatsbystage@gmail.com
347-858-5857
Fill out this field
Fill out this field
Please enter a valid email address.
Fill out this field
ARTIST HEADSHOT
COMMERCIAL SHOOT
MODEL TEST
INTERIOR SHOOT
ACTOR HEADSHOT
MEDICAL HEADSHOT
INDUSTRIAL SHOOT
BUSINESS SHOOT
MUSICIAN HEADSHOT
ONLINE REMOTE INTERVIEWS
PODCAST / INTERVIEW REC
GREEN SCREEN PRODUCTION
PHOTO STUDIO RENTAL
VIDEO STUDIO RENTAL
BLOG
REQUEST
STUDIO POLICY
PRODUCTIONS

          Useful information about working in the studio from the blog

+1 (347) 858-5857
37 W 26th St studio 315, New York, NY 10010
2025 All Rights Reserved