
Night Landscape Photography: Camera Settings, Moonlight & Pro Tips
Learn how to master night landscape photography with professional camera settings, composition techniques, moonlight photography tips, planning strategies, and expert workflows for consistently stunning images.
Night Landscape Photography: Professional Techniques for Moonlight, City Lights, and Long Exposures
Key Takeaways
- Night landscape photography is about controlling light rather than simply photographing darkness.
- Planning is often more important than camera settings.
- Modern digital cameras have dramatically expanded what’s possible after sunset, but composition still matters more than equipment.
- Long exposures let photographers reveal details invisible to the human eye while preserving the atmosphere of the scene. See long exposure techniques and our long exposure photography guide.
- Professional night photographers carefully evaluate weather and moon phase, artificial lighting, and foreground elements before pressing the shutter.
- Understanding how different light sources interact is the foundation of consistently successful night photography.
Introduction
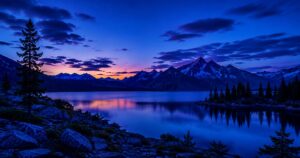
Night has always transformed the landscape. Familiar locations become mysterious, cities take on an entirely different personality, and mountains, forests, lakes, and coastlines reveal shapes and textures invisible during daylight. Instead of overwhelming detail, the photographer works with selective light, deep shadows, reflections, silhouettes, and atmosphere.
That transformation is what makes night landscape photography one of the most technically demanding — and creatively rewarding — genres in photography.
Many beginners assume the biggest challenge is simply capturing enough light. Experienced photographers quickly discover that darkness is only a small part of the equation. Successful night photography depends on understanding where light comes from, how it interacts with the environment, and how the viewer’s eye moves through the frame.
This idea isn’t new — it’s one of the oldest lessons in landscape photography, dating back to the film era, and it still holds: great night photographs begin long before the shutter opens. Modern mirrorless cameras, high-dynamic-range sensors, sophisticated autofocus, and powerful RAW processing software have removed many of film’s technical limitations, but they haven’t replaced careful observation. Professional photographers still spend far more time studying the scene than adjusting camera settings.
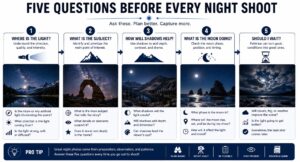
A successful night landscape usually results from answering a few simple questions before the camera ever touches a tripod: Where is the primary source of light? What should remain in shadow? Does the composition still work without daylight color? Which foreground elements create depth? Will changing weather improve the photograph? Is it worth waiting another twenty minutes? These decisions are what separate intentional photography from accidental photography. See how to prepare before shooting at night.
Whether you’re photographing a quiet mountain lake under moonlight, the illuminated skyline of New York, reflections after rainfall, or fireworks above a city, the underlying process is remarkably similar. This guide walks through how experienced commercial photographers approach night landscapes — from planning and composition to exposure, lighting, and post-processing — using modern digital workflows while holding onto the timeless principles that continue to define exceptional landscape photography. For foundational exposure concepts, see our guide to the exposure triangle.
↑ Back to top · Table of Contents
Why Is Night Landscape Photography Different from Daytime Photography?
Every landscape photographer eventually discovers that photographing after sunset requires an entirely different mindset. During the day, sunlight provides abundant illumination across the whole scene, and the challenge is deciding what to include in the frame. At night, it’s the opposite: instead of deciding what to remove, you have to decide what deserves to be illuminated. That distinction fundamentally changes how photographers think about composition.
Night Photography Is About Light, Not Darkness
One of the biggest misconceptions is that night photography is primarily about photographing dark scenes. It isn’t — it’s about photographing small amounts of light surrounded by darkness. Those light sources might include moonlight, illuminated buildings, streetlights, vehicle headlights, reflections, stars, campfires, fireworks, lightning, or illuminated windows, and each produces its own visual language.
Rather than trying to brighten the entire scene, professional photographers learn to balance illuminated areas against carefully preserved shadows. Those shadows aren’t problems to eliminate — they’re part of the composition.
Human Vision Sees Very Differently Than Your Camera
Our eyes continuously adapt to darkness. After a few minutes outside at night, we start recognizing detail that initially seemed invisible. The camera sensor doesn’t work that way — it records only the light collected during the exposure, which is why photographs sometimes look dramatically different from what we remember seeing.
A city skyline, for example, may appear comfortably balanced to your eyes, while the camera sees extremely bright windows, nearly black streets, intense streetlights, and dark building facades. That enormous brightness range is one of the defining challenges of night photography. Use the histogram and review camera settings for high-contrast urban scenes. Modern full-frame sensors have significantly improved dynamic range, but they still can’t perfectly reproduce everything our eyes perceive at once, so professional photographers make deliberate creative choices about which areas should retain detail and which should stay in shadow.
Long Exposures Reveal an Invisible World
Perhaps the greatest creative advantage of night photography is that the camera can record time itself. During a long exposure, clouds become flowing textures, water turns into smooth reflections, traffic creates ribbons of light, stars form circular trails across the sky, crowds disappear from busy streets, and wind softens foliage. None of these effects can be seen directly by the human eye — they exist only because the camera accumulates light over time. That ability turns photography into something more than documentation; it becomes interpretation. Learn more in our long exposure photography guide.
Artificial Light Creates New Composition Opportunities
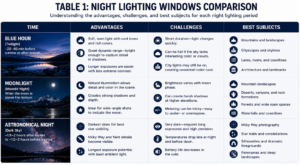
Unlike daytime landscapes, night scenes often contain multiple independent light sources — warm window light, cool LED streetlights, neon signs, reflections, moonlight, vehicle headlights, and illuminated bridges can all appear in a single frame. Rather than fighting these different colors, experienced photographers use them to create depth and visual hierarchy. A warmly lit building surrounded by cool blue twilight immediately draws attention, and a reflection on wet pavement naturally guides the viewer toward the primary subject. Light itself becomes one of the strongest compositional tools available.
Atmosphere Becomes Part of the Photograph
Weather has a greater influence on night photography than on almost any other landscape genre. A scene photographed on consecutive evenings can look completely different depending on atmospheric conditions: light fog diffuses artificial lighting into soft halos, mist increases depth, recent rainfall creates reflections that double the visual impact of city lights, and thin clouds partially covering the moon often produce more dramatic photographs than a perfectly clear sky. Professional photographers rarely cancel a night shoot just because conditions seem imperfect — instead, they learn which weather conditions enhance which subjects.
Why Planning Matters More After Sunset
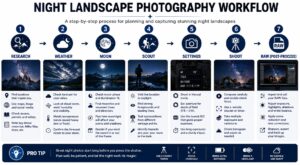
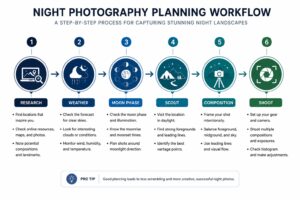
During daylight, photographers can often improvise. At night, improvisation usually leads to frustration. Professional night photography begins hours — sometimes days — before arriving on location. Successful photographers routinely study weather forecasts, moon phase, moonrise and moonset times, sunset time, blue hour duration, cloud movement, tide charts for coastal scenes, traffic patterns, access restrictions, and artificial lighting schedules. This preparation dramatically increases the odds of coming home with successful images. See pre-shoot preparation and location scouting. Many iconic night photographs result not from extraordinary luck, but from careful planning combined with patience.
↑ Back to top · Table of Contents
How Should You Prepare Before Shooting at Night?
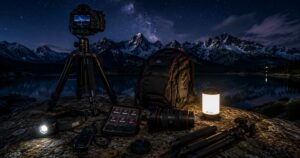
The quality of a night landscape often depends more on preparation than on any camera setting. Professionals understand that once darkness falls, every mistake becomes harder to correct — a forgotten flashlight, a drained battery, or an inaccessible location can end a shoot before it begins. That’s why experienced photographers treat preparation as part of the creative process rather than a checklist to rush through.
Scout the Location Before Sunset
One of the oldest pieces of advice in landscape photography still holds true: never try to figure out your composition in complete darkness. Professional photographers almost always arrive early. Scouting during daylight lets you identify foreground subjects, evaluate safety hazards, locate tripod positions, determine possible compositions, anticipate how artificial lights will appear after sunset, and visualize how the scene will change through blue hour and into full darkness.
Walking through the location before sunset also helps you spot distractions that may disappear — or become more prominent — once the light changes. A cluttered parking lot may empty out after sunset, while illuminated signs may become dominant visual elements. Understanding these transitions lets you anticipate the strongest composition instead of just reacting to it.
↑ Back to top · Table of Contents
What Camera Settings Produce the Best Night Landscapes?
One of the first questions photographers ask before attempting their first night landscape is deceptively simple: “What camera settings should I use?” There’s no universal answer. Unlike studio photography, where lighting can be controlled with precision, every night landscape presents its own combination of darkness, artificial light, atmospheric conditions, and subject movement. A moonlit desert, an illuminated city skyline, a foggy forest, and a coastal scene during blue hour all call for different approaches.
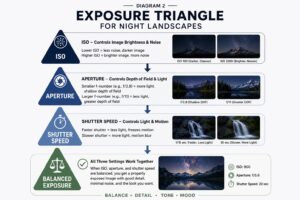
Professional photographers don’t memorize one exposure — they understand how each exposure triangle setting affects the final image and adjust accordingly. Jump to aperture, ISO, or shutter speed.
Start with Image Quality, Not Exposure
Before thinking about shutter speed or ISO, configure the camera for maximum image quality. Always shoot night landscapes in RAW. RAW files preserve substantially more information in shadows and highlights than JPEGs, allowing you to recover details during post-processing that would otherwise be lost permanently. Night photography often involves extreme brightness differences between shadows and artificial lights, and a RAW file gives you far more flexibility when balancing those areas in editing. JPEG should only be considered when immediate delivery matters more than image quality.
Why Manual Mode Gives You Complete Control
Automatic exposure systems work well in daylight because scenes are usually evenly illuminated. Night scenes are different — bright streetlights surrounded by deep shadows can easily confuse a camera’s light meter, and automatic exposure frequently ends up brighter or darker than intended.
Experienced photographers rely on Manual Mode whenever possible, since it lets them control aperture, shutter speed, and ISO independently. Instead of reacting to the camera’s interpretation of the scene, you make deliberate creative decisions.
Choosing the Right Aperture
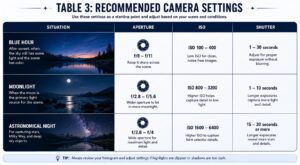
Aperture controls more than exposure — it determines depth of field, overall sharpness, and even the appearance of artificial light sources. For most night landscapes, professionals typically work between f/8 and f/11, a range that provides excellent sharpness across the frame while maintaining sufficient depth of field.
There are exceptions. Use a wider aperture, typically f/1.4–f/2.8, when photographing stars, working in very limited light, using shorter shutter speeds, or shooting handheld. Use a smaller aperture, typically f/11–f/16, when maximum depth is required, foreground elements are close to the camera, or you’re photographing city lights and want pronounced starburst effects. Keep in mind that extremely small apertures increase diffraction, which gradually reduces sharpness — many photographers assume f/22 always produces the sharpest landscape, but it usually doesn’t.
ISO: Lower Is Usually Better
Modern cameras handle high ISO remarkably well, but that doesn’t mean you should automatically raise ISO whenever it gets dark. Professional landscape photographers generally follow a simple principle: raise ISO only after you’ve exhausted the advantages of a tripod and a longer shutter speed. If the subject is stationary, there’s little reason to introduce unnecessary noise.
Typical starting points: ISO 100–400 for moonlit landscapes, ISO 100–200 during blue hour, ISO 100–400 for urban night photography, ISO 1600–6400 for stars, and ISO 1600–6400 (depending on camera performance) for handheld night photography. Every increase in ISO slightly reduces dynamic range — lower ISO almost always produces smoother tonal transitions, cleaner shadows, and more flexibility during editing.
Shutter Speed Determines the Mood
During daylight, shutter speed often freezes movement. At night, it becomes one of the most creative decisions you make. Long exposures transform the appearance of motion: water turns silky, clouds stretch across the sky, vehicle headlights become elegant ribbons of light, and people disappear from busy streets. The difference between a five-second exposure and a thirty-second exposure can completely change the emotional impact of an image. Professional photographers rarely choose shutter speed simply to hit “correct” exposure — instead, they ask, “What should movement look like?” See long exposures and our long exposure guide.
Focus Is Harder Than Exposure
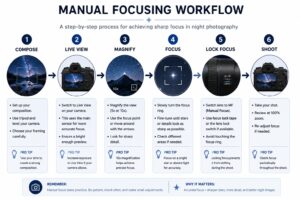
Exposure mistakes can often be corrected; poor focus usually can’t. Autofocus systems perform well today, but even the most advanced cameras struggle in extremely dark environments. Professionals often switch to manual focus after composing the scene, using techniques such as focusing during blue hour before darkness sets in, magnifying Live View, using focus peaking, focusing on a bright distant light, or briefly using a flashlight to illuminate a foreground subject. Full workflow: focus in the dark and FAQ on focusing at night. Once focus is achieved, avoid touching the focus ring — many photographers accidentally shift it while adjusting filters or cleaning the lens.
White Balance Changes the Mood
Night scenes often contain multiple color temperatures within a single photograph — moonlight, LED streetlights, sodium vapor lamps, neon signs, and illuminated windows can all appear at once. Trying to neutralize every light source often strips out the atmosphere that made the scene appealing in the first place.
When shooting RAW, many professionals leave white balance on Auto and fine-tune color during post-processing. Others prefer manually setting a cooler white balance for moonlit landscapes while preserving warmer tones around artificial lighting. The goal isn’t perfect color accuracy — it’s preserving the emotional atmosphere of the scene.
Learn to Trust the Histogram
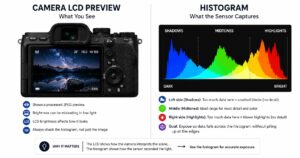
One of the biggest mistakes beginners make is judging exposure from the LCD screen alone. At night, display brightness becomes misleading — a photograph that looks bright on the camera may actually be underexposed, and lowering LCD brightness may convince you the exposure is perfect when important highlights are already clipped. Professional photographers rely primarily on the histogram, which gives objective information about tonal distribution regardless of screen brightness. Checking it after every important exposure dramatically improves consistency.
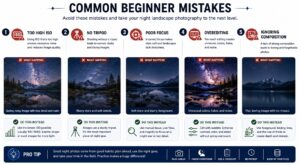
Professional Tip: Many experienced landscape photographers intentionally expose slightly darker than the camera recommends. Protecting highlights around streetlights, illuminated buildings, and reflections often produces a more natural final image than trying to brighten every shadow during capture.
↑ Back to top · Table of Contents
How Do You Photograph Moonlit Landscapes?
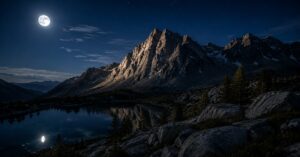
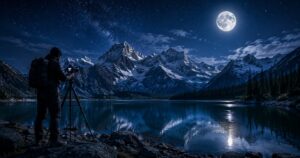
Moonlight is one of the most beautiful — and misunderstood — light sources in landscape photography. Many people imagine moonlit scenes as extremely dark, but in reality a bright full moon can illuminate an entire landscape surprisingly well. Mountains, lakes, forests, deserts, and coastlines often develop subtle textures that resemble daylight while still carrying the unmistakable atmosphere of night. Photographing these scenes successfully requires understanding how the moon behaves as a natural light source.
Not Every Moon Produces the Same Photograph
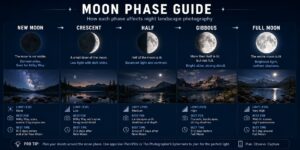
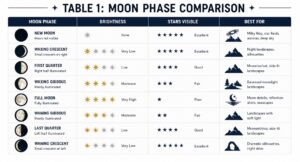
The phase of the moon changes everything. A full moon produces strong illumination but reduces the visibility of stars; a crescent moon preserves darker skies but contributes far less light to the landscape. Many professionals choose the period just before or after the full moon, when the landscape receives enough illumination while shadows remain dramatic enough to preserve depth. Understanding moon phase lets photographers plan around creative intent rather than relying on chance. See pre-shoot planning and location scouting.
Think About the Moon Like the Sun
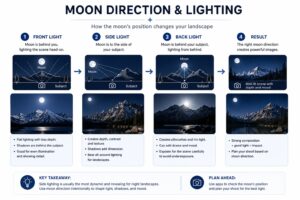
Although dramatically less intense, the moon behaves much like the sun — its direction determines shadow length, texture, contrast, and visual depth. Front lighting often produces flat images, side lighting reveals texture across rocks, trees, sand dunes, and mountain ridges, and backlighting creates silhouettes and luminous edges. This principle hasn’t changed from the film era to today’s mirrorless cameras: light direction is always more important than camera technology.
Include the Moon — or Let It Stay Outside the Frame?
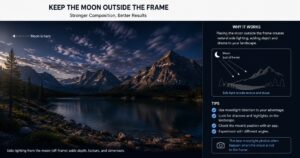
One of the most common beginner mistakes is automatically placing the moon inside every composition. Sometimes it works beautifully; often it doesn’t. The moon is extremely bright compared to the surrounding landscape, and including it frequently forces the camera to compromise between preserving lunar detail and exposing the foreground correctly. Professional photographers ask a different question: “Does the moon improve the composition?” If the answer is no, letting moonlight illuminate the landscape from outside the frame often creates a stronger photograph.
Exposing Moonlit Landscapes
Moonlight appears gentle to the human eye, but the camera records it differently — a typical moonlit scene contains bright highlights, deep shadows, subtle textures, and low overall contrast. Because the scene changes slowly, photographers can use relatively long shutter speeds without worrying about subject movement. Instead of raising ISO unnecessarily, professionals often extend the exposure while keeping ISO as low as practical, preserving cleaner shadows and greater dynamic range.
Don’t Eliminate Every Shadow
One of the defining characteristics of moonlight is mystery — darkness contributes as much to the composition as the illuminated areas. Beginners often try to recover every shadow during editing, and the result usually feels artificial. Professional photographers deliberately let portions of the frame stay dark, since those shadows create visual balance, depth, and atmosphere. The viewer’s imagination fills in what the camera doesn’t reveal.
Weather Can Improve Moonlight
Perfectly clear skies aren’t always ideal. Thin clouds moving across the moon soften harsh illumination and create subtle tonal transitions; light mist can separate foreground and background through atmospheric perspective; and reflections on wet rocks, lakes, and roads become significantly more dramatic under moonlight. Many award-winning night landscapes were captured in conditions that less experienced photographers would have written off as unsuitable. Learning to recognize favorable weather is one of the fastest ways to improve night photography.
Professional Workflow: Photographing a Moonlit Coastal Landscape

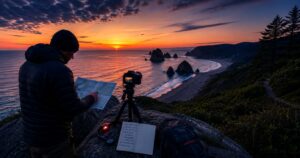
Imagine arriving at a rocky coastline forty-five minutes before moonrise. You scout the shoreline while there’s still enough twilight to evaluate safe footing and potential compositions, spending several minutes observing how the waves interact with the foreground rocks and where reflections begin to form.
As the moon rises, you position the tripod low to emphasize the texture of the foreground, keeping the moon itself outside the frame so its light can sculpt the landscape naturally without introducing an overly bright focal point. Instead of raising ISO to compensate for fading light, you extend the shutter speed, creating smooth water that contrasts beautifully with the sharp rocks. After each exposure, you check the histogram rather than the LCD preview, adjusting only when necessary.

By the end of the session, you’ve captured several variations with different wave patterns, cloud formations, and reflections — all from the same tripod position, but shaped into a diverse set of images by the changing light. This methodical approach illustrates an important principle of professional landscape photography: success rarely comes from chasing dramatic moments. More often, it comes from careful preparation, patience, and letting the changing light transform an already strong composition.
↑ Back to top · Table of Contents
Frequently Asked Questions (FAQ)
- What are the best camera settings for night landscape photography?
- There is no single preset, but professionals typically shoot in Manual Mode, use RAW, start at f/8–f/11 for depth of field, keep ISO as low as practical, and choose shutter speed based on subject movement. See the full camera settings section and our exposure triangle guide.
- What ISO should I use for night landscape photography?
- Raise ISO only after maximizing tripod stability and shutter time. Starting points: ISO 100–400 for moonlit scenes, 100–200 at blue hour, 100–400 for cities, and 1600–6400 for stars or handheld work. Details in ISO: Lower Is Usually Better.
- How do I focus in the dark for night landscapes?
- Switch to manual focus: compose in Live View, magnify, use focus peaking or a distant light, or focus during blue hour before darkness. Lock focus and avoid touching the ring. See Focus Is Harder Than Exposure.
- Can I photograph the moon and stars in the same night landscape?
- A bright full moon illuminates the landscape but washes out stars; crescent and quarter moons preserve darker skies. Many photographers choose nights just before or after full moon for balance. See moon phase guide and moon in or out of frame.
- Should I shoot RAW or JPEG for night photography?
- Always RAW for night landscapes. RAW preserves shadow and highlight detail essential for balancing artificial lights and deep shadows in post. See Start with Image Quality, Not Exposure.
- What is blue hour and why does it matter for night photography?
- Blue hour is the transitional period after sunset when the sky retains color and there is enough light to scout compositions and focus manually. It bridges daylight planning and full darkness. See Introduction and scouting before sunset.
- Do I need a tripod for night landscape photography?
- Yes, for most serious night landscape work. A stable tripod lets you use longer shutter speeds and lower ISO, producing cleaner images. Handheld is possible at very high ISO for urban snapshots but not ideal for landscape quality. See gear preparation.
- Why should I use the histogram instead of the LCD at night?
- LCD brightness varies and misleads at night; the histogram shows objective tonal distribution and helps prevent clipped highlights around streetlights and windows. See Learn to Trust the Histogram.


