
Night Landscape Photography: City Lights, Fireworks, Lightning & Professional Workflow
Night landscape photography depends less on expensive gear than on timing, composition, exposure control, and a repeatable workflow. This guide focuses on city lights, fireworks, lightning, foreground lighting, editing, and practical field technique.
Night Landscape Photography — City Lights, Fireworks, Lighting Techniques, and Workflow
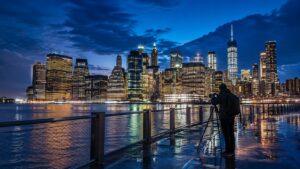
Key Takeaways
- Arrive before darkness. Blue hour often gives the best balance between sky and artificial light.
- Use composition first and camera settings second.
- Keep ISO as low as practical when a tripod allows longer exposures.
- Add foreground light only when it improves depth or guides attention.
- Post-processing should preserve atmosphere, texture, and believable color.
- Consistency comes from a repeatable shooting and editing workflow.
Introduction
This is Part 2 of the night landscape photography guide. Part 1 covers planning, camera settings, moonlit landscapes, and exposure fundamentals. This section concentrates on urban night scenes, fireworks, lightning, supplemental lighting, editing, and the workflow that ties those techniques together.
How Do Professionals Photograph Cities at Night?
Strong city photographs are usually planned before the light becomes dramatic. Arrive early, walk the location, choose a foreground, level the camera, and watch how reflections, traffic, building lights, and sky brightness change as daylight fades.
Use Blue Hour Before Full Darkness
The strongest urban night images are often made about 20–40 minutes after sunset. The sky still has color, buildings remain separated from the background, and artificial lights are bright without overwhelming the exposure. For more timing guidance, see Best Time of Day for Landscape Photography.
Use Reflections and Foreground
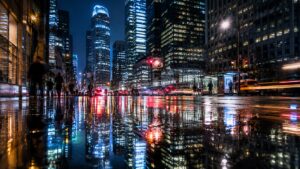
Wet streets, rivers, glass, railings, bridges, boats, and road markings create depth and help lead the eye toward the skyline. A strong foreground often matters more than photographing the tallest building.
Use Traffic as a Compositional Element
Long exposures can turn headlights into clean leading lines. Wait for traffic patterns that support the composition instead of recording every passing vehicle. Too much traffic creates clutter; too little may leave the frame visually empty.
Preserve Useful Color Contrast
Urban scenes combine warm interiors, cool LEDs, signs, headlights, and reflections. Do not neutralize every color cast. Controlled warm–cool contrast often makes the image feel more natural and gives different parts of the frame visual separation.
Control Geometry
Level the horizon and avoid unnecessary upward camera tilt. Correcting leaning verticals later often requires heavy cropping, so architectural geometry is best handled during capture.
City Night Workflow

Scout before sunset, choose the final composition, level the tripod, then photograph through the transition into blue hour. Capture a few variations in exposure and traffic flow, check focus and highlights, and stop only after the light has clearly passed its best balance.
How Do You Capture Fireworks and Lightning?
Both subjects are unpredictable, so simplify everything you can before the action begins: position, composition, focus, tripod stability, and exposure strategy.
Prepare Before the Event
Arrive early enough to choose a stable position, check wind direction, include a useful foreground or landmark, and establish focus before the first firework. Once the display begins, avoid changing the entire setup after every burst.
Lock Focus
Autofocus can struggle with darkness, smoke, and rapidly changing light. Focus on a distant building or bright object, confirm sharpness, then switch to manual focus so the lens does not hunt between exposures.
Keep ISO Low and Protect Highlights
Fireworks are bright. Start with a low ISO and use a longer exposure to record multiple bursts and ambient city light. Check the histogram and highlights instead of raising ISO unnecessarily. For exposure fundamentals, see Night Landscape Photography Camera Settings.
Photograph Lightning With Time, Not Reflexes
Compose first, use a stable tripod, and let longer exposures improve the chance of recording a strike. Never work from an exposed location during dangerous weather; safety takes priority over the image.
Watch Smoke and Wind
Smoke accumulates as a fireworks show continues. Reassess the wind and, when practical, shift position if smoke begins to block the view.
Fireworks Workflow
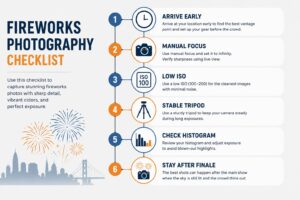
Scout the location, arrive before crowds, establish the composition, lock focus, use low ISO and controlled long exposures, and keep photographing for a few minutes after the finale. Lingering smoke and illuminated city lights can produce some of the most atmospheric frames.
When Should You Add Foreground Lighting?
Foreground light should improve depth or direct attention. If the scene already works with moonlight or ambient light, adding more illumination may reduce realism rather than improve it.

Let Some Areas Stay Dark
Darkness creates mood and visual hierarchy. Do not illuminate every rock, tree, or building equally. Light only the elements that help the composition.
Use Light Painting With Restraint
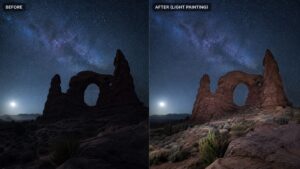
During a long exposure, move a flashlight or LED across selected foreground areas instead of holding it in one position. Continuous movement reduces hotspots and produces softer, more natural-looking illumination.
LED, Flash, or Existing Light?
LED panels are predictable because you can see the effect before exposure. Flash is useful when you need to freeze nearby movement or balance a bright background. Existing sources such as vehicle headlights, cabins, or streetlights may be even more natural. Choose the simplest light that supports the scene.
Avoid Over-Lighting
Common problems include foregrounds brighter than the main subject, competing shadows, extreme color temperature, and obvious hotspots. Good supplemental lighting should be difficult to notice.
How Do You Process Night Landscape Photos?
Night editing is mainly about balancing extreme brightness differences while preserving believable texture and color. The goal is not to make the frame look like daylight.
1. Control Highlights First
Reduce clipped streetlights, signs, windows, and reflections before opening shadows. This usually creates more natural tonal transitions than aggressively brightening the entire image.
2. Reduce Noise Without Removing Texture
Use enough noise reduction to clean the file, but stop before stone, foliage, and stars begin to look soft or plastic. Subtle grain is usually less distracting than excessive smoothing.
3. Use White Balance for Atmosphere
Preserve useful differences between cool moonlight and warm artificial light instead of forcing every part of the image to the same neutral color.
4. Use Local Adjustments Sparingly
Dodging and burning can guide attention, control distracting highlights, enhance reflections, and reveal foreground texture. These adjustments should support the composition without announcing themselves.
5. Sharpen Last and Export for the Final Use

A practical sequence is: import and select, correct lens issues, balance exposure and white balance, recover highlights and shadows, reduce noise, make local adjustments, resize, sharpen, and export. Repeatable steps improve both speed and consistency.
Professional Workflow for Night Landscape Photography
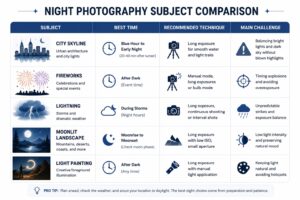
- Research: check access, weather, cloud cover, sunset time, moon phase, parking, permits, and safety.
- Arrive early: walk the location and choose compositions before the light changes quickly.
- Capture variations: adjust camera height, focal length, shutter speed, and foreground emphasis rather than relying on one frame.
- Verify: check critical focus, highlights, dust spots, movement, and unwanted distractions before leaving.
- Back up: keep at least two copies of the files before formatting cards.
For composition planning, see Landscape Photography Composition.
Professional Tips That Actually Matter
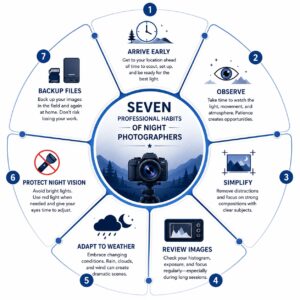
- Arrive 60–90 minutes early. You gain time to scout, build the composition, and work through blue hour.
- Stay with a strong scene. Clouds, fog, reflections, and artificial lights can improve over time.
- Use weather rather than automatically avoiding it. Fog, mist, thin clouds, and recent rain often add atmosphere.
- Simplify the frame. Darkness is useful for removing distractions.
- Review images in the field. Check focus, clipping, motion blur, and tripod vibration before leaving.
- Protect night vision and the location. Reduce screen brightness, work safely, stay on established paths, and leave the area undisturbed.
Common Mistakes in Night Landscape Photography
- Arriving after blue hour. The best balance of sky and artificial light may already be gone.
- Changing settings before fixing composition. A perfect exposure cannot rescue a weak frame.
- Raising ISO too quickly. With a stable tripod, a longer shutter speed often gives cleaner results.
- Overprocessing. Excessive clarity, saturation, HDR, sharpening, or shadow recovery quickly looks artificial.
- Ignoring foreground depth. A skyline or star field often needs a foreground element to create scale.
- Leaving too soon. Conditions can improve after the main event, especially after rain, fireworks, or changing clouds.
Commercial Applications
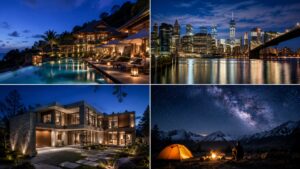
Night photography is useful wherever atmosphere matters. Luxury hotels and resorts use blue-hour images to show architecture and amenities with warmth. Tourism campaigns use illuminated districts, festivals, waterfronts, and scenic overlooks to communicate experience. Real-estate and architectural assignments often rely on twilight to balance interior and exterior light. Outdoor brands use night landscapes to associate products with exploration and adventure.
Frequently Asked Questions
- What is the best time to photograph night landscapes?
- Start during blue hour and continue into darkness. Blue hour gives the best balance between ambient sky and artificial light, while later hours may be better for stars, moonlight, and long exposures.
- Do I need a full-frame camera?
- No. APS-C and Micro Four Thirds cameras can produce excellent results when exposure is controlled carefully and a tripod is used.
- Should I always use a tripod?
- For most night landscapes, yes. A tripod allows lower ISO, longer exposures, and more deliberate composition.
- Is autofocus reliable at night?
- It can work in brighter scenes, but manual focus is often more reliable in very dark landscapes, fireworks, and stars.
- Why do my night photos look noisy?
- Common causes are high ISO, underexposure, heavy shadow recovery, and sensor heat during long exposures.
- How do professionals keep night photographs sharp?
- Use a stable tripod, accurate focus, an appropriate aperture, a remote release or self-timer, and verify sharpness before leaving.
- Is post-processing part of professional night photography?
- Yes. Editing is used to balance exposure, color, noise, local contrast, and final sharpening while preserving a believable scene.
- Can weather improve night photography?
- Yes. Fog, mist, thin clouds, and recent rainfall can add reflections, depth, and atmosphere.
Conclusion
Successful night landscape photography comes from preparation, composition, controlled exposure, and patience. Arrive early, use the available light before adding your own, protect highlights, keep editing believable, and review your files before leaving. A repeatable process produces stronger results than constantly changing technique.


