
Industrial Lighting Guide: How to Light Machinery for Professional Photography
Lighting Industrial Machinery: Professional Techniques for Technical and Commercial Photography
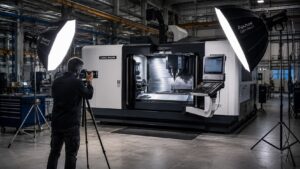
Lighting is the single most important factor in industrial photography. Even the most advanced camera cannot compensate for poor lighting when photographing complex machinery, polished metal, or large manufacturing equipment.
Unlike consumer product photography, industrial photography presents unique challenges. Machines often contain glossy steel, aluminum, chrome, painted surfaces, glass, and deep mechanical cavities—all within the same subject. A successful lighting setup must reveal the engineering design without creating distracting reflections or hiding critical details.
The objective is simple:
Reveal form, structure, texture, and function while maintaining technical accuracy.
Start with the Environment
Most industrial equipment is photographed inside active manufacturing facilities rather than in controlled studios.
Production floors introduce several complications:
- overhead fluorescent or LED fixtures
- mixed color temperatures
- reflective concrete floors
- surrounding machinery
- pipes and cables
- safety barriers
- limited working space
Instead of fighting the environment, begin by evaluating how the existing light interacts with the machine.
Determine whether the ambient lighting contributes useful illumination or should simply become your base exposure.
Why Factory Lighting Usually Isn’t Enough
Factory lighting is designed for production—not photography.
Its purpose is to help employees perform tasks safely and efficiently.
Photographers need something entirely different.
Typical factory lighting produces:
- flat surfaces
- weak separation
- deep shadows underneath machinery
- little texture
- poor dimensionality
The machine often blends into the background.
Professional industrial photography almost always requires additional lighting.
The Goal Is Shape, Not Brightness
One of the biggest mistakes beginners make is simply adding more light.
Industrial photography is not about making machines brighter.
It is about revealing their three-dimensional form.
Every lighting decision should emphasize:
- structure
- depth
- engineering details
- manufacturing quality
- material texture
If viewers immediately understand how the machine is constructed, the lighting is successful.
Build Light One Source at a Time
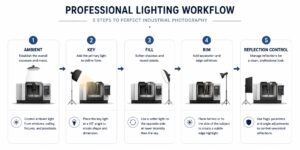
Instead of turning on every available light, construct the scene gradually.
Step 1 — Evaluate the Ambient Light
Step 2 — Add Your Primary Key Light
Step 3 — Introduce Fill Light
Step 4 — Add Rim Lighting
Step 5 — Control Reflections
Working incrementally allows every light to have a clear purpose.
The Three-Light Industrial Setup

A classic industrial lighting arrangement remains one of the most effective solutions.
Key Light
Placed approximately 45 degrees from the camera.
Purpose:
- reveal machine geometry
- establish direction
- create volume
Large soft sources produce smoother reflections on painted surfaces.
Fill Light
Positioned opposite the key.
Purpose:
- reduce excessive shadows
- preserve detail inside machinery
- soften contrast
The fill should remain noticeably weaker than the key.
If both lights have identical intensity, the machine will appear flat.
Separation (Rim) Light
Placed behind or above the subject.
Purpose:
- separate the machine from the background
- define edges
- increase visual depth
Even subtle rim lighting dramatically improves subject isolation inside crowded factories.
Photographing Polished Metal

Highly polished metal presents one of the greatest technical challenges in industrial photography.
Chrome, stainless steel, aluminum, and polished machine parts behave like mirrors.
The camera records reflections—not metal.
Instead of pointing lights directly at reflective surfaces, illuminate large diffused panels.
The metal should reflect:
- diffusion fabric
- softboxes
- white foam boards
- overhead scrims
rather than the light source itself.
Large reflections appear smooth and controlled.
Small reflections become distracting hotspots.
Control Reflections Instead of Eliminating Them
Completely reflection-free metal rarely looks natural.
Controlled reflections define shape.
Uncontrolled reflections destroy it.
Ask yourself:
Can I identify the machine’s curves from the reflections?
If the answer is yes, the reflections are helping.
Using Reflectors
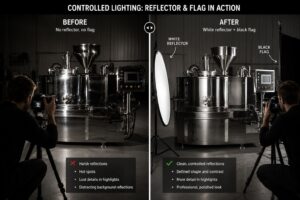
Reflectors are among the most valuable tools in industrial photography.
White reflectors:
- soften shadows
- reveal hidden details
- preserve texture
Silver reflectors:
- increase brightness
- add contrast
- create crisp highlights
Black flags:
- reduce unwanted reflections
- improve edge definition
- increase contrast on polished surfaces
Many experienced industrial photographers rely more on reflectors than on additional lights.
Photographing Large Industrial Equipment
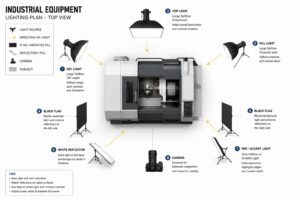
Large manufacturing systems cannot always be illuminated by a single source.
Examples include:
- printing presses
- production lines
- paper machines
- steel processing equipment
- packaging systems
These subjects often require multiple lighting positions.
Rather than trying to illuminate the entire machine evenly, divide it into visual sections.
Maintain consistent exposure while preserving directional light.
Use Modern LED Lighting
Today’s LED fixtures offer significant advantages over traditional tungsten lighting.
Benefits include:
- consistent color temperature
- low heat output
- battery operation
- precise brightness control
- lightweight construction
Popular choices for industrial photographers include:
- Aputure LS series
- Nanlite Forza
- Godox Knowled
- Prolycht
- Creamsource
- Profoto continuous lighting
Large soft modifiers produce smooth gradients on painted machinery while maintaining sufficient power for high-resolution photography.
Mixed Lighting Techniques
Some of the most successful industrial photographs combine available light with artificial lighting.
For example:
Natural daylight enters through factory windows.
LED fixtures illuminate the machine.
Small accent lights define polished edges.
This combination produces realistic images while maintaining complete control over contrast.
Avoid Common Lighting Mistakes
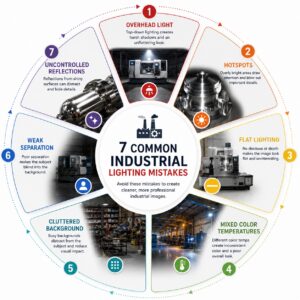
Do not:
- place lights directly above the machine
- use bare reflectors on chrome
- flatten the image with excessive fill
- ignore background brightness
- mix multiple color temperatures without correction
- allow overhead lights to create uncontrolled glare
Every light should solve a problem—not create one.
Background Separation
Industrial environments are visually busy.
Rather than attempting to eliminate every distraction, create separation through lighting.
Reduce illumination on the background while keeping the machine bright.
Alternatively, introduce a subtle rim light behind the subject.
The viewer’s eye naturally moves toward the brightest, highest-contrast object in the frame.
Use this principle deliberately.
Photographing Machines in Operation
When documenting active production, lighting should never interfere with safety.
Always:
- coordinate with plant personnel
- secure light stands
- avoid blocking emergency pathways
- protect cables
- prevent reflections that obscure operator visibility
Safety always takes priority over photography.
Modern Lighting Workflow
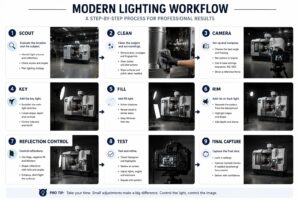
A typical professional workflow includes:
- Clean the machine.
- Remove temporary objects.
- Evaluate ambient light.
- Position the camera.
- Add the key light.
- Introduce fill.
- Add edge lighting.
- Control reflections with flags.
- Check metal highlights.
- Fine-tune exposure.
- Capture documentation images.
- Produce marketing compositions.
Final Thoughts
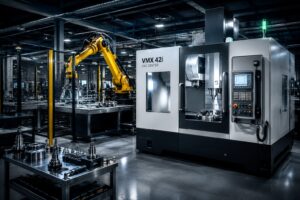
Professional industrial lighting is not about creating dramatic effects—it is about making engineering visible.
The best industrial photographs allow viewers to understand the machine instantly.
Carefully controlled highlights, balanced shadows, subtle reflections, and deliberate separation work together to reveal craftsmanship, manufacturing quality, and engineering precision.
Whether photographing a CNC machining center, robotic assembly cell, pharmaceutical equipment, or heavy industrial machinery, thoughtful lighting remains the foundation of every successful industrial photograph.
Frequently Asked Questions (FAQ)
What is the best lighting for industrial photography?
Large diffused LED sources combined with reflectors provide the most natural results while preserving detail across complex machinery.
Should industrial machinery be photographed with hard or soft light?
Most equipment benefits from soft directional lighting. Hard light is useful only when emphasizing texture or surface defects.
How do you photograph reflective metal?
Light the reflection rather than the metal itself by using large diffusers, softboxes, and white panels. Control unwanted reflections with black flags.
How many lights are needed for industrial photography?
A three-light setup (key, fill, and separation light) is sufficient for most machines. Larger installations may require additional fixtures.


