
Video Photo Studio
  • Video Studio
  • Photography Studio
  • Production
    • Podcast / Interview Rec
    • Green Screen Production
    • Business Headshot
    • Actor Headshot
    • Artist Headshot
    • Musician Headshots
    • Commercial shoot
    • Interior shoot
Posted on 16 Jul at 4:27 pm

Industrial Macro Photography: How to Photograph Machine Parts and Engineering Components

Learn professional techniques for photographing machine parts, gears, precision components, CNC parts, and industrial products for engineering documentation, manufacturing catalogs, and technical marketing.

Photographing Machine Parts and Industrial Components: Creating Images That Reveal Engineering Precision

Table of Contents

  1. Understand the Function Before Photographing the Component
  2. Choose Camera Angles That Reveal Geometry
  3. Reveal Surface Texture
  4. Background Selection Matters
    • Bright Aluminum Components
    • Dark Steel Components
  5. Glass as a Professional Background
  6. Position Components to Show Depth
  7. Stabilize Every Component
  8. Photographing Gears
  9. Photographing Chrome and Polished Metal
  10. Photographing Black Components
  11. Depth of Field Is Critical
  12. Lens Selection
  13. Maintain Technical Accuracy
  14. Organize the Composition
  15. Photograph Components for Multiple Uses
  16. Modern Industrial Workflow
  17. Common Mistakes
  18. Final Thoughts
  19. Frequently Asked Questions

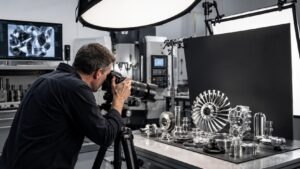
Industrial photography extends far beyond documenting entire machines. Engineers, manufacturers, and technical buyers frequently need detailed photographs that reveal individual components, machining quality, manufacturing tolerances, and surface finishes.

Unlike traditional product photography, technical component photography is not intended merely to create attractive images. It must communicate precision, craftsmanship, material quality, and engineering function.

A successful photograph should answer a critical question:

“Can an engineer understand this component without physically holding it?”

If the answer is yes, the photograph has achieved its purpose.


Understand the Function Before Photographing the Component

The most effective industrial photographers begin by learning how a component works.

Ask engineers questions such as:

  • What is this part designed to do?
  • Which surfaces are critical?
  • Which machining operations should be visible?
  • Which tolerances matter most?
  • What distinguishes this design from competing products?

Understanding function helps determine:

  • camera position
  • lighting direction
  • background
  • lens selection
  • depth of field

Technical photography begins with technical knowledge.


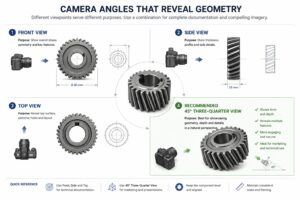
Choose Camera Angles That Reveal Geometry

Many mechanical parts lose their three-dimensional appearance when photographed straight on.

Consider photographing:

  • gears
  • turbine blades
  • helical screws
  • impellers
  • valves
  • cutting tools

A frontal view often hides their engineering characteristics.

Instead, rotate the component until its geometry becomes obvious.

Even a small change in camera position can dramatically improve the image.


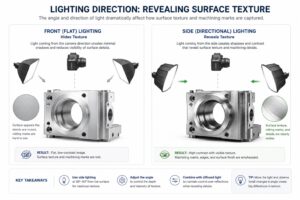
Reveal Surface Texture

Machined metal contains valuable visual information.

Photographs should reveal:

  • milling marks
  • turning patterns
  • grinding finishes
  • polishing quality
  • casting texture
  • welding quality
  • anodizing
  • powder coating

Flat front lighting removes texture.

Directional side lighting reveals it.

Texture is often more important than color.


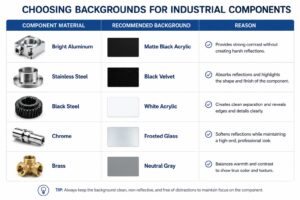
Background Selection Matters

The background should never compete with the component.

A simple background allows viewers to focus entirely on engineering details.

General guidelines:

Bright aluminum components

Use:

  • matte black acrylic
  • black velvet
  • dark composite panels

Dark steel components

Use:

  • white acrylic
  • light gray paper
  • frosted glass

Contrast improves edge definition and simplifies post-processing.


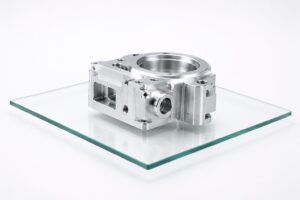
Glass as a Professional Background

Many industrial photographers overlook glass.

Clear glass placed above a white background creates several advantages:

  • soft shadows
  • clean separation
  • floating appearance
  • easier masking
  • reduced background texture

This technique remains highly effective for catalog photography.


Position Components to Show Depth

Flat objects appear lifeless when placed parallel to the camera.

Whenever possible:

Tilt the component approximately 30–45 degrees.

This creates:

  • perspective
  • dimensionality
  • visible thickness
  • improved edge definition

The viewer immediately perceives volume.


Stabilize Every Component

Technical photography requires precision.

Small parts should remain perfectly stationary.

Common methods include:

  • museum wax
  • removable adhesive
  • invisible supports
  • acrylic rods
  • magnetic fixtures
  • custom positioning jigs

Support systems should never distract from the subject.


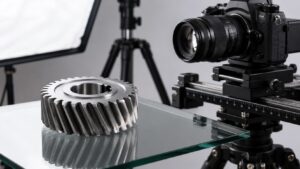
Photographing Gears

Gears present unique lighting challenges.

Direct frontal lighting often makes teeth disappear.

Instead:

Use directional side lighting.

The resulting shadows define:

  • tooth profile
  • helix angle
  • involute geometry
  • machining quality

Engineers immediately recognize the difference.


Photographing Chrome and Polished Metal

Highly reflective components require careful control.

Remember:

You are photographing reflections.

Large diffused light sources produce smooth highlights.

Small hard lights create distracting hotspots.

Use:

  • large softboxes
  • diffusion panels
  • white foam boards
  • black flags

to sculpt reflections deliberately.


Photographing Black Components

Black anodized aluminum and painted steel often lose detail.

Increase separation by using:

  • light backgrounds
  • edge lighting
  • subtle fill light

Avoid simply increasing exposure.

Doing so reduces contrast and destroys texture.


Depth of Field Is Critical

Engineering photography demands maximum sharpness.

Most component photography benefits from:

  • f/11
  • f/13
  • f/16

For macro photography:

Consider focus stacking.

This technique combines multiple images captured at different focus distances into one perfectly sharp photograph.

It is now standard practice for high-end industrial documentation.


Lens Selection

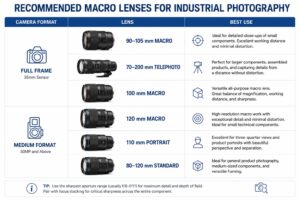
Recommended lenses:

Full Frame

  • 90–105 mm macro
  • 70–200 mm telephoto
  • 100 mm macro

Medium Format

  • 120 mm macro
  • 110 mm portrait lens
  • 80–120 mm standard lenses

Macro lenses minimize distortion while maximizing sharpness.


Maintain Technical Accuracy

Avoid excessive editing.

Do not:

  • remove manufacturing marks
  • eliminate machining patterns
  • smooth metal texture
  • distort proportions
  • exaggerate colors

Technical photography documents reality.

Accuracy builds trust.


Organize the Composition

Complex assemblies should appear organized.

Arrange components logically.

For exploded views:

Maintain equal spacing.

Keep orientation consistent.

Allow engineers to understand assembly relationships without referring to diagrams.


Photograph Components for Multiple Uses

Capture several variations:

  • isolated catalog image
  • close-up detail
  • engineering documentation
  • website hero image
  • brochure layout
  • square social media crop

Creating multiple compositions during one session maximizes production efficiency.


Modern Industrial Workflow

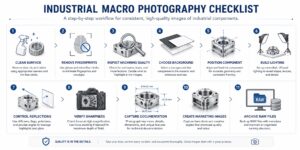
Professional component photography typically follows this sequence:

  1. Clean every surface.
  2. Remove fingerprints.
  3. Inspect machining quality.
  4. Choose the background.
  5. Position the component.
  6. Build the lighting.
  7. Control reflections.
  8. Verify critical sharpness.
  9. Capture documentation images.
  10. Create marketing compositions.
  11. Record detail close-ups.
  12. Archive RAW files systematically.

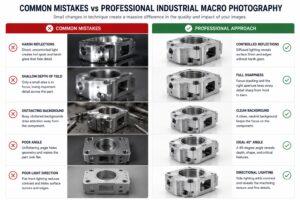
Common Mistakes

Avoid:

  • photographing parts from only one angle
  • using wide-angle lenses
  • flattening texture with frontal light
  • allowing reflections to hide machining quality
  • choosing distracting backgrounds
  • using shallow depth of field
  • excessive retouching

Precision photography demands precision technique.


Final Thoughts

Machine parts represent the heart of every industrial product.

Whether documenting aerospace components, medical devices, precision gears, robotic assemblies, automotive systems, or CNC-machined parts, the photographer’s responsibility is to communicate engineering excellence with complete visual accuracy.

Exceptional industrial photography balances technical documentation with visual storytelling. Every photograph should demonstrate craftsmanship, manufacturing quality, and functional design while remaining truthful to the product itself.

In today’s manufacturing industry, high-quality technical images are essential not only for catalogs and engineering reports but also for websites, AI-powered search engines, digital product databases, investor presentations, and global marketing campaigns.


Industrial Macro Photography: How to Photograph Machine Parts and Engineering Components

Frequently Asked Questions


What lens is best for photographing machine parts?

A dedicated macro lens between 90 mm and 120 mm (full-frame equivalent) provides the highest sharpness with minimal distortion.


Should industrial components be photographed on white or black backgrounds?

It depends on the material. Bright aluminum or stainless steel usually photographs best on matte black backgrounds, while dark or black components benefit from white or light gray backgrounds.


How do you photograph reflective metal parts?

Use large diffused light sources, diffusion panels, and black flags to control reflections. The goal is to shape reflections rather than eliminate them.


Is focus stacking necessary?

For high-magnification technical photography, yes. Focus stacking ensures that every critical feature remains sharp, making it the preferred technique for engineering documentation and high-end product catalogs.


Previous Post
Industrial Lighting Guide: How to Light Machinery for Professional Photography
Next Post
Landscape Photography Composition: Professional Techniques for Better Photos
Landscape Photography Camera Settings: Exposure, Filters & Pro Workflow

Landscape Photography Camera Settings: Exposure, Filter…

22 hours ago
Landscape Photography Composition: Professional Techniques for Better Photos

What Time of Day Produces the Best Landscape Photos? A…

2 days ago
Professional photographer composing a mountain landscape during sunrise using a tripod and mirrorless camera

Landscape Photography Composition: Professional Techniq…

3 days ago
Let’s Connect
Facebook
Twitter
Pinterest
Instagram
Telegram
37 West 26th st. NYC, NY 10010
gatsbystage@gmail.com
347-858-5857
Fill out this field
Fill out this field
Please enter a valid email address.
Fill out this field
ARTIST HEADSHOT
COMMERCIAL SHOOT
MODEL TEST
INTERIOR SHOOT
ACTOR HEADSHOT
MEDICAL HEADSHOT
INDUSTRIAL SHOOT
BUSINESS SHOOT
MUSICIANT HEADSHOT
ONLINE REMOTE INTERVIEWS
POSCAST / INTERVIEW REC
GREEN SCREEN PRODUCTION
PHOTO STUDIO RENTAL
VIDEO STUDIO RENTAL
BLOG
REQUEST
STUDIO POLICY
PRODUCTIONS

          Useful information about working in the studio from the blog

+1 (347) 858-5857
37 W 26th St studio 315, New York, NY 10010
2025 All Rights Reserved