
Industrial Machine Photography: Professional Techniques for Accurate Machinery Images
Excerpt
Learn professional industrial machine photography techniques, including camera angles, lens selection, lighting, perspective control, and workflows for creating accurate images engineers, manufacturers, and customers trust.
Industrial Machine Photography: How to Create Images That Engineers and Customers Trust
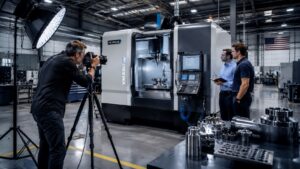
Effective industrial machine photography begins with a viewpoint that communicates how equipment is built and how it operates. The hero image above demonstrates a three-quarter angle that preserves realistic proportions while showing major assemblies, workflow paths, and overall machine scale — principles covered throughout this guide alongside perspective control, lens selection, and lighting techniques.
Whether the final deliverable supports technical documentation, a product catalog, or a trade show display, the camera position must answer the same engineering question: how does this machine work, and why is it designed this way? Images that achieve this standard become valuable for sales teams, investors, and operators alike — not merely attractive marketing assets but reliable visual records of manufacturing quality.
Table of Contents
- Understand the Purpose Before Picking Up the Camera
- Show the Machine as Engineers Designed It
- Learn How the Equipment Works
- Choose Camera Angles That Explain the Design
- Avoid Extreme Wide-Angle Lenses
- Control Perspective Instead of Fixing It Later
- Depth of Field Matters More Than Background Blur
- Photograph Machines in Their Finished State
- Reveal Function, Not Just Appearance
- Keep the Environment Under Control
- Document Before You Create
- Common Industrial Machine Photography Mistakes
- Final Thoughts
- Related Articles
- Frequently Asked Questions
Industrial photography is fundamentally different from commercial product photography. The goal isn’t simply to create an attractive image—it’s to communicate engineering design, manufacturing quality, and functional purpose. Whether you’re photographing CNC machines, industrial robots, packaging equipment, printing presses, medical devices, or custom manufacturing systems, your photographs should answer one question: how does this machine work, and why is it designed this way? An effective industrial photograph combines technical accuracy with visual clarity, making it valuable for engineers, sales teams, marketing departments, investors, and customers alike.
Understand the Purpose Before Picking Up the Camera
Before selecting a camera angle or focal length, professional industrial machine photographers clarify how each image will be used — because the intended audience determines whether the result should read as neutral documentation or dramatic marketing. The planning workflow infographic below maps the decision path from initial client objectives through on-site consultation, technical capture, and final delivery across catalogs, engineering reports, and investor presentations.

The workflow diagram reinforces a principle that separates professional industrial machine photography from casual factory snapshots: purpose drives every technical decision, from lighting style to camera position. Marketing images may embrace drama, while engineering documentation must remain neutral and informative. Referencing this sequence at the start of every assignment prevents wasted shooting time and ensures deliverables meet the communication requirements of engineers, sales teams, and commercial stakeholders alike.
Define the Intended Use of Every Industrial Photograph
Every industrial photography project starts with understanding the client’s objectives. Ask questions such as:
- Is this image intended for technical documentation?
- Will it appear in a product catalog?
- Is it for an engineering report?
- Will it be used on the company’s website?
- Is it for a trade show display?
- Is it part of an investor presentation?
The intended use determines everything, from camera position to lighting style. Marketing images can be dramatic. Engineering documentation should stay neutral, informative, and technically accurate.
Show the Machine as Engineers Designed It
Photograph the Entire Machine Before Individual Components
One of the most common mistakes inexperienced photographers make is getting fixated on a single beautiful component: a polished spindle, a chrome valve, a complex gearbox. These elements may look visually impressive, but they rarely represent the entire machine. Instead, start by asking what the defining feature of this equipment is. The best photographs immediately communicate:
- machine size
- overall construction
- operating mechanism
- workflow
- major assemblies
- engineering purpose
The viewer should recognize the machine instantly, without reading the caption.
Learn How the Equipment Works
Consult Engineers and Machine Operators Before Shooting
Professional industrial photographers rarely start shooting right away. Spend a few minutes with plant operators, maintenance technicians, engineers, and production managers. Ask them:
- Which side best represents the machine?
- Which components are unique?
- Which features should customers notice?
- Which parts perform the primary operation?
This short conversation often saves hours of unnecessary shooting. Engineers frequently know the most informative viewing angle before the photographer does.
Choose Camera Angles That Explain the Design
Camera angle is the fastest way to help viewers understand industrial machinery without reading a caption. For most equipment, a three-quarter viewpoint reveals front face, side profile, depth, and the spatial relationships between major assemblies — all while preserving the realistic proportions engineers expect. The diagram below illustrates why this perspective outperforms straight-on or extreme low angles for communicating machine geometry.
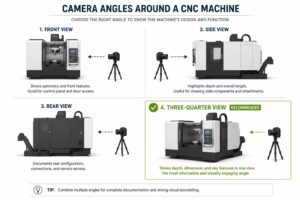
Consulting operators and engineers before choosing a viewpoint often confirms what the diagram suggests: the most informative angle is rarely the most convenient one on a crowded factory floor. Pair a three-quarter position with moderate focal lengths and proper perspective control so the finished industrial machine photograph reads as an accurate engineering document rather than a distorted marketing exaggeration.
Use Three-Quarter Views to Reveal Machine Geometry
The camera should reveal the machine’s geometry, not distort it. For most industrial equipment, the strongest viewpoint is a three-quarter angle. This perspective reveals front, side, depth, and structural relationships while preserving realistic proportions.
Avoid Extreme Wide-Angle Lenses
Focal length directly affects whether an industrial machine photograph preserves engineering accuracy or misrepresents physical dimensions. Ultra-wide lenses exaggerate length, height, and spacing between components — producing dramatic images that engineers cannot trust. The comparison table below lists recommended focal lengths for full-frame, APS-C, and medium format systems when photographing medium equipment and machinery details.
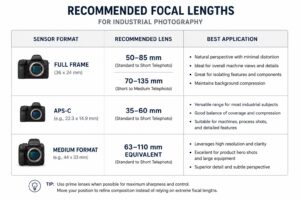
Reserve ultra-wide lenses only when no alternative camera position exists for very large installations. For everyday assignments, the ranges in the table align with classic industrial lens recommendations — moderate telephoto lengths that maintain natural proportions and allow the photographer to step back rather than distort geometry. Combined with in-camera perspective control, these focal lengths keep spacing between components visually honest.
Choose Focal Lengths That Preserve Engineering Accuracy
One recommendation from classic industrial photography remains just as relevant today: avoid extremely wide lenses unless absolutely necessary. Wide-angle lenses can exaggerate machine length, height, perspective, and spacing between components. That distortion may create a dramatic image, but it often misrepresents engineering reality.
Recommended Focal Lengths for Industrial Machinery
Full Frame
- 50–85 mm for medium equipment
- 70–135 mm for machinery details
APS-C
- 35–60 mm
Medium Format
- 63–110 mm equivalent
Reserve ultra-wide lenses for very large installations where no alternative camera position exists.
Control Perspective Instead of Fixing It Later
Maintain Natural Proportions Through Proper Camera Position
Modern editing software can correct perspective, but correcting severe distortion always costs image quality. It’s better to move farther away, use a longer focal length, and keep the camera level. This approach preserves natural proportions while maintaining maximum sharpness.
Depth of Field Matters More Than Background Blur
Unlike portrait photography, industrial machine photography requires every critical component to remain sharp simultaneously so engineers can inspect the full assembly in a single frame. Working at f/11 through f/16, increasing subject distance, or raising camera height extends depth of field without sacrificing resolution. The example below shows how controlled aperture and distance keep foreground and background machinery details equally readable.
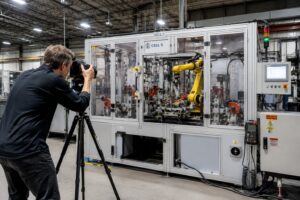
When a single aperture cannot deliver sufficient depth across large equipment, focus stacking combines multiple exposures without opening the lens wider or accepting soft corners. This technique pairs naturally with moderate focal lengths and accurate perspective, ensuring the final industrial machine photograph functions as both a marketing asset and a reliable technical reference for manufacturers and customers.
Keep Every Critical Machine Component Sharp
Unlike portrait photography, industrial photography requires viewers to inspect the entire machine, so critical components need to stay sharp simultaneously. This usually means working at f/11, f/13, or f/16, depending on sensor size and subject distance. If you need more depth, increase shooting distance, use focus stacking, or raise camera height rather than opening the aperture.
Photograph Machines in Their Finished State
Capture the Manufacturing Process at the Right Moment
When photographing operating machinery, timing matters. Wait until the workpiece reaches a visually complete stage. For example, instead of photographing a CNC machine cutting raw aluminum, wait until the finished component clearly demonstrates the machining process. The image immediately becomes more informative.
Reveal Function, Not Just Appearance
Great industrial machine photographs teach viewers how equipment operates without relying on captions or callouts. Before pressing the shutter, confirm the frame answers practical engineering questions: material entry and exit points, moving components, operator position, and scale relative to surrounding workflow. The checklist infographic below summarizes the visual criteria professionals use to evaluate whether an image explains design rather than merely decorating a brochure.
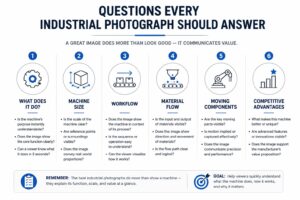
Function-driven composition depends on accurate lighting to reveal mechanical detail without hiding features in shadow, plus camera angles that expose operating mechanisms clearly. Cross-reference the checklist when reviewing captures on a factory floor or during post-shoot editing — if the image cannot teach an engineer something new at a glance, reconsider angle, timing, or light placement before delivery.
Use Photography to Explain Engineering Design
Industrial photographs should answer several questions without words: What does the machine do? How large is it? Where does material enter, and where does it exit? Which components move? Where is the operator positioned? What makes this machine different from competitors? Good industrial photography explains. Great industrial photography teaches.
Keep the Environment Under Control
Active manufacturing facilities introduce visual noise — cables, pallets, forklifts, warning signs, and foot traffic — that competes with the machine for attention. Professional industrial machine photographers remove distractions when possible and use lighting, angle, and depth to separate subject from surroundings when they cannot. The comparison image below contrasts a cluttered factory floor with a controlled composition that preserves context without sacrificing clarity.

Environment control on a live production floor also means managing reflections on polished metal surfaces and coordinating with plant staff so safety barriers and temporary storage do not block the defining view. Thoughtful lighting and a slightly longer focal length often accomplish separation that physical cleanup cannot — keeping the setting authentic while ensuring the machine remains the undisputed focal point.
Eliminate Factory Distractions Without Losing Context
Factories are visually busy environments. Common distractions include cables, pallets, tools, warning signs, forklifts, temporary storage, packaging, and workers walking through the frame. Remove unnecessary distractions whenever possible. When removal isn’t an option, use lighting, camera angle, depth, and composition to separate the machine from its surroundings.
Document Before You Create
Experienced industrial machine photographers capture technically accurate documentation before pursuing dramatic marketing compositions. Neutral exposures, honest perspective, and complete machine coverage guarantee engineering stakeholders receive reliable records even when creative images later push lighting toward the theatrical. The workflow diagram below sequences documentation-first capture through final marketing delivery.
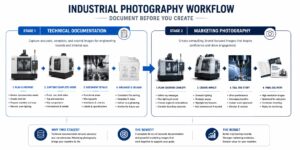
The documentation-first sequence aligns industrial machine photography with how engineers, quality teams, and investors evaluate equipment — accuracy before aesthetics. After neutral records are secured, photographers can introduce directional lighting, refined angles, and commercial styling for catalogs and trade shows, confident that no marketing experiment has replaced the authoritative visual baseline the client requires.
Complete Technical Documentation Before Marketing Images
Many photographers reach for dramatic lighting first. Professional industrial photographers usually do the opposite: capture technically accurate documentation first, and only after completing those images move on to artistic marketing photographs. This workflow guarantees that engineering documentation is never compromised.
Common Industrial Machine Photography Mistakes
Even skilled photographers compromise technical accuracy when rushing on a factory schedule or chasing visually striking details. Random angles, unnecessary ultra-wide lenses, hidden components in shadow, and dramatic lighting that obscures engineering features all reduce the trust engineers place in an image. The comparison table below catalogs frequent errors alongside their impact on industrial machine photography quality.

Reviewing the mistake table before every assignment reinforces habits that preserve accuracy: consult operators first, photograph the complete machine, choose moderate focal lengths, and control perspective distortion in camera. Many errors trace back to inadequate lighting on reflective surfaces — a challenge addressed in dedicated guides on photographing reflective machinery and industrial exposure strategy.
Professional Mistakes That Reduce Technical Accuracy
Avoid these frequent errors:
- photographing from random angles
- using ultra-wide lenses unnecessarily
- letting important components disappear into shadows
- emphasizing attractive details instead of the complete machine
- shooting before understanding machine operation
- ignoring perspective distortion
- creating dramatic images that hide engineering features
Final Thoughts
Combining Technical Precision with Visual Communication
Industrial photography is about communication, not decoration. The best images combine technical precision with visual clarity, letting engineers, customers, investors, and operators understand a machine at a glance. When composition, perspective, lens selection, and subject knowledge work together, the resulting photographs become valuable engineering documents as well as compelling marketing assets.
Related Articles
- Industrial Lighting Guide — Learn how to light complex machinery, polished metal, and large manufacturing equipment without creating distracting reflections.
- Industrial Macro Photography — Photograph precision components, reflective surfaces, gears, and machined parts with controlled lighting and comprehensive sharpness.
- Industrial Photography & Video Production — Explore professional industrial photography and video production for factories, machinery, manufacturing processes, and technical content.
- Commercial Photo & Video Production — Full-service commercial photography and video production for marketing, websites, presentations, and campaign assets.
- Photographic Lenses — Review lens principles and focal-length choices for accurate perspective and controlled distortion.
- Depth of Field Guide — Understand how aperture, focal length, and subject distance affect the range of acceptable sharpness.
Frequently Asked Questions
FAQ Navigation
- What is industrial machine photography?
- Why should you define the purpose before picking up the camera?
- What camera angles work best for industrial machinery?
- What focal lengths are recommended for industrial machinery?
- Why should you avoid extreme wide-angle lenses?
- What aperture settings keep industrial machines sharp?
- Should you photograph machines during operation?
- What are the most common industrial photography mistakes?
- How do you control factory distractions in industrial photographs?
- What is the professional documentation workflow for industrial photography?
What is industrial machine photography?
Industrial machine photography is a specialized discipline focused on communicating engineering design, manufacturing quality, and functional purpose—not simply creating attractive images. Unlike commercial product photography, the goal is to help engineers, sales teams, marketing departments, investors, and customers understand how a machine works and why it is designed a specific way. Effective industrial photographs combine technical accuracy with visual clarity, covering equipment such as CNC machines, industrial robots, packaging systems, printing presses, medical devices, and custom manufacturing systems. The best images function as both engineering documents and marketing assets.
Why should you define the purpose before picking up the camera?
Every industrial photography project must begin with understanding the client’s objectives because the intended use determines camera position, lighting style, and overall approach. Images may serve technical documentation, product catalogs, engineering reports, company websites, trade show displays, or investor presentations—and each application demands different treatment. Marketing images can be dramatic, while engineering documentation should remain neutral, informative, and technically accurate. Defining purpose upfront prevents wasted shooting time and ensures the final photographs meet the specific communication requirements of the project.
What camera angles work best for industrial machinery?
For most industrial equipment, the strongest viewpoint is a three-quarter angle that reveals front, side, depth, and structural relationships while preserving realistic proportions. The camera should reveal the machine’s geometry, not distort it. Before choosing an angle, consult plant operators, maintenance technicians, engineers, and production managers—they often know the most informative viewing angle. Start by photographing the entire machine before focusing on individual components, ensuring the viewer can recognize the equipment instantly and understand its size, construction, operating mechanism, workflow, major assemblies, and engineering purpose.
What focal lengths are recommended for industrial machinery?
Focal length selection should preserve engineering accuracy rather than create dramatic distortion. On full-frame cameras, use 50–85 mm for medium equipment and 70–135 mm for machinery details. On APS-C sensors, 35–60 mm is appropriate. On medium format systems, aim for 63–110 mm equivalent focal lengths. Reserve ultra-wide lenses only for very large installations where no alternative camera position exists, because wide-angle lenses can exaggerate machine length, height, perspective, and spacing between components—creating visually dramatic but technically misleading images that misrepresent engineering reality.
Why should you avoid extreme wide-angle lenses?
Extremely wide lenses exaggerate machine length, height, perspective, and spacing between components. While that distortion may produce a dramatic image, it often misrepresents engineering reality—making equipment appear larger, longer, or differently proportioned than it actually is. Classic industrial photography guidance recommends avoiding ultra-wide lenses unless absolutely necessary, such as when photographing very large installations with no alternative camera position. Instead, move farther from the subject, use a longer focal length, and keep the camera level to preserve natural proportions and maximum sharpness without relying on post-processing corrections.
What aperture settings keep industrial machines sharp?
Unlike portrait photography, industrial photography requires every critical component to remain sharp simultaneously because viewers need to inspect the entire machine. This typically means working at f/11, f/13, or f/16, depending on sensor size and subject distance. Background blur is less important than comprehensive sharpness across the frame. If additional depth of field is needed, increase shooting distance, use focus stacking, or raise camera height rather than opening the aperture wider. These techniques ensure that all engineering details remain visible and technically accurate in the final image.
Should you photograph machines during operation?
Yes, when the goal is to reveal function and demonstrate the manufacturing process—but timing is critical. Wait until the workpiece reaches a visually complete stage rather than capturing intermediate steps. For example, instead of photographing a CNC machine cutting raw aluminum, wait until the finished component clearly demonstrates the machining process, making the image immediately more informative. Operating photographs should answer questions about what the machine does, how material enters and exits, which components move, and where the operator is positioned—teaching the viewer about engineering design through visual communication.
What are the most common industrial photography mistakes?
Frequent errors include photographing from random angles, using ultra-wide lenses unnecessarily, letting important components disappear into shadows, emphasizing attractive details instead of the complete machine, shooting before understanding machine operation, ignoring perspective distortion, and creating dramatic images that hide engineering features. Inexperienced photographers often fixate on single beautiful components—such as a polished spindle or chrome valve—rather than representing the entire machine. Professional industrial photographers prioritize showing the equipment as engineers designed it, ensuring viewers recognize the machine instantly and understand its defining features without reading a caption.
How do you control factory distractions in industrial photographs?
Factories contain visually busy environments with cables, pallets, tools, warning signs, forklifts, temporary storage, packaging, and workers moving through the frame. Remove unnecessary distractions whenever possible. When removal is not an option, use lighting, camera angle, depth of field, and composition to separate the machine from its surroundings. The environment should support the subject without competing for attention. Professional industrial photographers keep the setting under control while preserving enough context to show the machine in its real operating environment, balancing clarity with authenticity.
What is the professional documentation workflow for industrial photography?
Professional industrial photographers capture technically accurate documentation first, then move on to artistic marketing photographs. Many inexperienced photographers reach for dramatic lighting immediately, but prioritizing documentation guarantees that engineering accuracy is never compromised. The workflow begins with understanding the intended use of every photograph, consulting engineers and operators, photographing the complete machine, choosing accurate camera angles and focal lengths, controlling perspective and depth of field, managing the factory environment, and only then creating marketing compositions. This sequence produces images that serve as reliable engineering documents and compelling commercial assets.


