
Video Photo Studio
  • Video Studio
  • Photography Studio
  • Production
    • Podcast / Interview Rec
    • Green Screen Production
    • Business Headshot
    • Actor Headshot
    • Artist Headshot
    • Musician Headshots
    • Commercial shoot
    • Interior shoot
Posted on 19 Jul at 11:55 pm

Landscape Photography Camera Settings: Exposure, Filters & Pro Workflow

Master landscape photography camera settings with professional exposure techniques, filters, ISO, aperture, and field workflows used by experienced commercial photographers.

Landscape Photography Camera Settings: Professional Exposure, Filters, and Field Workflow

Table of Contents

  1. Key Takeaways
  2. Introduction
  3. Why Do Camera Settings Matter More Than Camera Gear?
  4. How Do Professionals Determine Exposure in Landscape Photography?
  5. Professional Tip
  6. Frequently Asked Questions

Key Takeaways

  • Professional landscape photography is built on repeatable field techniques rather than expensive equipment.
  • Correct exposure starts with understanding light, not memorizing camera settings.
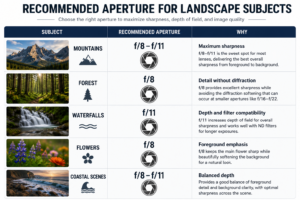
  • Aperture affects more than depth of field — it also determines optical sharpness.
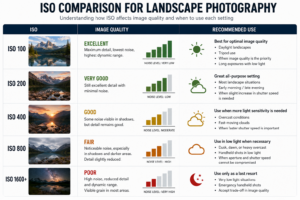
  • ISO should be selected strategically rather than automatically kept at its lowest value.
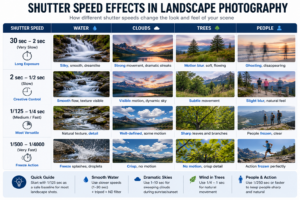
  • Shutter speed is a creative decision that influences mood, movement, and storytelling.
  • Modern digital cameras have replaced many traditional film techniques, but the underlying photographic principles remain unchanged.
  • Professional photographers rely on a structured workflow that minimizes mistakes before they leave the location.

Introduction

Every landscape photographer eventually asks the same question: “What are the best camera settings for landscape photography?” It’s one of the most searched topics in photography — and unfortunately, one of the most misunderstood.

Many articles promise a universal formula: ISO 100, f/11, tripod, done. Those numbers are often a reasonable starting point, but they ignore the reality of professional photography. There’s no single exposure that works for every mountain range, waterfall, forest, desert, coastline, or national park. Landscape photography is a process of solving visual problems, not following a recipe. To improve your landscape composition, study composition before changing camera settings.

That distinction becomes obvious the moment you start shooting outside controlled conditions. Light changes every few minutes. Clouds alter the scene. Wind moves the trees. Water never stops flowing. A dramatic sunrise may last less than sixty seconds before the contrast turns too harsh or the color disappears entirely.

Professional photographers don’t succeed because they’ve memorized camera settings — they succeed because they understand why those settings work, when they need to change, and how to adapt quickly as conditions evolve. This isn’t a new idea. Decades of photography literature written for film cameras, darkrooms, and photographic chemistry arrived at the same central lesson, and it still holds: good photographs come from understanding light, not from relying on equipment. For a deeper explanation, see our landscape lighting guide.

Today’s digital cameras offer real advantages over film — we can instantly review exposures, analyze histograms, recover highlights from RAW files, and blend multiple exposures in post-processing. But none of these tools eliminate the need to recognize good light, evaluate contrast, or make thoughtful technical decisions in the field.

This guide applies those timeless concepts to today’s mirrorless and DSLR cameras. Rather than discussing obsolete film stocks or darkroom processing, it focuses on the techniques professional landscape photographers use on commercial assignments, editorial projects, and fine art work. Whether you’re photographing a national park at sunrise, shooting for a luxury resort, documenting a hiking destination, or building a portfolio for large-format prints, the principles are the same.

Let’s start with the most common misconception in landscape photography.

<!– Description: Professional photographer scouting sunrise location and evaluating natural light before selecting landscape photography camera settings. –>

Professional landscape photographer planning composition during sunrise in the mountains before selecting camera settings.
Professional photographers evaluate light and composition before adjusting exposure settings.

Why Do Camera Settings Matter More Than Camera Gear?

One of the biggest myths in photography is that a better camera automatically produces better landscape photographs. In reality, experienced photographers routinely create stronger images with older equipment than beginners do with the latest flagship camera. The reason is simple: a camera records light, but the photographer decides how that light is interpreted.

Great Landscape Images Are Built Before the Shutter Opens

Imagine standing in front of a spectacular mountain range. One photographer immediately sets up the tripod, mounts a wide-angle lens, and presses the shutter. Another spends twenty minutes walking the location first, observing where the shadows fall, how the foreground connects to the background, how the clouds are moving, where the sun will rise, which rocks create leading lines, and where distracting elements appear.

Both photographers own the same camera, but their photographs will look completely different.

<!– Description: Photographer studying foreground, light and composition before taking the first landscape photograph. –>

Landscape photographer scouting foreground and leading lines before setting up a tripod.
Walking the location before setting up often produces stronger landscape compositions.

Professional landscape photography begins long before exposure settings are adjusted — technical settings refine a photograph, but they rarely create one.

Cameras Capture Data — Photographers Create Images

Modern cameras have extraordinary capabilities. Today’s full-frame mirrorless bodies offer exceptional dynamic range, high-resolution sensors, sophisticated autofocus, image stabilization, advanced noise reduction, and accurate metering. Yet none of these features determine composition, timing, or storytelling — those decisions remain entirely human.

A professional photographer evaluates the scene before touching the camera, asking questions like: Where is the visual anchor? What attracts the viewer first? What distracts from the subject? Is the foreground helping the composition? Will the light improve if I wait? Does changing elevation improve depth? Only after answering these does exposure become relevant.

<!– Description: Mirrorless camera representing professional landscape photography equipment and creative decision making. –>

Modern mirrorless camera used for professional landscape photography workflow.
Professional cameras capture data, but photographers create compelling images.

Professional Workflow Begins with Observation

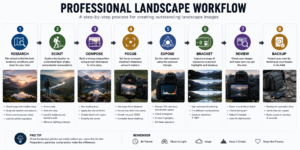
One habit separates professionals from beginners more than almost anything else: professionals don’t immediately assemble their equipment — they observe first. A typical workflow looks like this:

  1. Walk the location without the camera.
  2. Identify the strongest subject.
  3. Watch how the light changes.
  4. Study the background.
  5. Evaluate how the weather is moving.
  6. Choose among several possible compositions.
  7. Set up only after making the creative decisions.

This process often takes longer than the actual photography.

<!– Description: Illustration of a professional landscape photography workflow before exposure settings are selected. –>

Professional landscape photography workflow from observation to final composition.
Professionals observe first and photograph second.

Ironically, the best images frequently come from photographers who spend the least time pressing the shutter.

Understanding Light Is More Valuable Than Memorizing Settings

Many beginners ask, “What settings did you use?” Professionals rarely answer with just numbers — they explain why those numbers were chosen.

Instead of simply stating “f/11, ISO 100, 1/4 second,” an experienced photographer is thinking: I need maximum sharpness. The foreground must stay detailed. Wind is minimal. The water should retain a bit of movement. The highlights are close to clipping. I need another half-stop of protection.

Notice how the exposure decisions follow the creative goals

<!– Description: Diagram illustrating how creative intent influences exposure decisions. –>

Exposure decisions based on creative goals rather than fixed camera settings.
Camera settings should support the creative vision of the photograph.

— the camera settings simply carry them out.

Technology Cannot Replace Good Judgment

Modern cameras can determine exposure surprisingly well on their own, but automatic exposure systems can’t recognize artistic intent. The camera doesn’t know whether moving water should look silky or frozen, whether clouds should streak across the sky, whether shadows should stay dramatic, whether reflections are the primary subject, or whether mist is meant to conceal or reveal. Those decisions belong to the photographer.

Professional landscape photography is essentially the art of making intentional technical trade-offs

<!– Description: Diagram illustrating creative and technical trade-offs in professional landscape photography. –>

Balancing technical settings with artistic judgment in landscape photography.
Every camera setting involves creative trade-offs.

— every adjustment improves one aspect of the image while affecting another. Understanding those trade-offs is what separates experienced photographers from casual camera users.

How Do Professionals Determine Exposure in Landscape Photography?

Exposure is often presented as math. In reality, it’s visual interpretation. Professional photographers don’t simply trust the camera’s meter — they evaluate the entire scene.

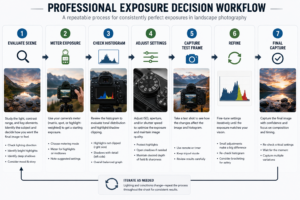
Step 1: Read the Light Before Looking at the Camera

Before raising the camera, experienced photographers examine the character of the light. Is the scene naturally soft, or does it contain extreme brightness differences? High-contrast situations include sunrise shot directly into the sun, bright snow, sunlit waterfalls, white clouds above dark forests, and canyon landscapes. Low-contrast scenes include fog, overcast weather, twilight, misty forests, and rainy mornings. Contrast determines the exposure strategy long before any camera settings are chosen.

<!– Description: Landscape showing different lighting conditions used to evaluate exposure strategy. –>

Reading natural light before raising the camera.
Understanding light is the first step toward accurate exposure.

Step 2: Identify the Most Important Tonal Values

Digital sensors record an enormous range of brightness, but they still have limits. Professionals ask, “What absolutely cannot lose detail?” Sometimes it’s the bright clouds; other times, the foreground rocks, the snow, or the reflections. The answer changes from scene to scene, and exposure is chosen around protecting whichever information matters most.

<!– Description: Example illustrating preservation of critical tonal values in landscape photography. –>

Protecting important tonal values in a high dynamic range landscape.
Professionals expose for the most important highlight and shadow detail.

Step 3: Use the Histogram — Not the LCD

One of the biggest beginner mistakes is judging exposure from the rear screen alone. LCD brightness changes dramatically depending on ambient light, screen settings, viewing angle, and battery level. The histogram tells the truth. Professional photographers routinely ignore how the image “looks” on the LCD and evaluate the histogram instead, since it immediately reveals clipped highlights, blocked shadows, unused dynamic range, and overall exposure balance. Learning to read a histogram is one of the fastest ways to improve exposure consistency.

<!– Description: Camera histogram demonstrating professional exposure evaluation. –>

Histogram used to evaluate exposure accurately.
The histogram provides a more reliable exposure evaluation than the LCD screen.

Step 4: Protect Highlights First

Unlike shadows, blown highlights often can’t be recovered. This matters most when photographing clouds, waterfalls, snow, white buildings, beaches, and ocean surf. Professional photographers generally prefer a slightly darker exposure if it means preserving highlight detail

<!– Description: Landscape example demonstrating highlight preservation in RAW workflow. –>

Preserving highlights in RAW landscape photography.
Recoverable shadows are preferable to clipped highlights.

— modern RAW files allow significant shadow recovery, but completely clipped highlights usually can’t be restored.

Step 5: Evaluate Dynamic Range

Some landscapes simply exceed the camera’s ability to record everything in one exposure — sunrise behind mountains, cave openings, forests against a bright sky, sunsets over water. Rather than accept lost detail, professionals often capture multiple exposures, a process known as exposure bracketing, a technique also widely used when photographing landscapes at night and mastering long exposure techniques, which produces several files at different brightness levels. These can later be blended naturally in post-processing

<!– Description: Series of bracketed exposures for blending a high dynamic range landscape. –>

Exposure bracketing for scenes with high dynamic range.
Multiple exposures preserve detail across the full tonal range.

so the final image still looks realistic while preserving detail across the full tonal range.

Step 6: Make a Test Exposure

Experienced landscape photographers rarely assume the first exposure is perfect. Instead, they capture a test frame and evaluate the histogram, highlight warnings, shadow detail, composition, edge distractions, and foreground sharpness. Only after these checks do they shoot the final series of images. That extra minute in the field often saves hours of frustration later.

<!– Description: Photographer reviewing a test exposure before completing a landscape photography session. –>

Checking a test exposure before capturing the final image.
Reviewing the histogram and sharpness improves final image quality.

Professional Tip

One of the most valuable habits you can develop is slowing down before making technical decisions. Landscape photography rewards deliberate observation far more than rapid shooting. The most successful professionals don’t simply react to changing conditions — they anticipate them. By understanding how light evolves, evaluating exposure methodically, and refining settings before the decisive moment arrives, they dramatically increase the consistency and quality of their work.

<!– Description: Final workflow summary for professional landscape photography. –>

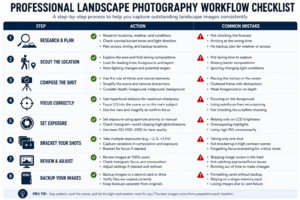
Professional landscape photography field workflow checklist.
A consistent workflow improves image quality and reduces mistakes.


Landscape Photography Camera Settings: Exposure, Filters & Pro Workflow

Frequently Asked Questions

What are the best camera settings for landscape photography?

There is no single formula. Professional photographers adjust exposure according to light, dynamic range and creative intent. See the exposure workflow.

Does expensive camera gear produce better landscape photos?

No. Understanding light and composition is more important than owning expensive equipment. Read this section.

Why should photographers use the histogram?

The histogram provides a more accurate exposure evaluation than the LCD screen. Learn more.

Back to Table of Contents ↑

Previous Post
What Time of Day Produces the Best Landscape Photos? A Professional Guide to Natural Light
Landscape Photography Composition: Professional Techniques for Better Photos

What Time of Day Produces the Best Landscape Photos? A…

3 days ago
Professional photographer composing a mountain landscape during sunrise using a tripod and mirrorless camera

Landscape Photography Composition: Professional Techniq…

3 days ago
Industrial Macro Photography: How to Photograph Machine Parts and Engineering Components

Industrial Macro Photography: How to Photograph Machine…

4 days ago
Let’s Connect
Facebook
Twitter
Pinterest
Instagram
Telegram
37 West 26th st. NYC, NY 10010
gatsbystage@gmail.com
347-858-5857
Fill out this field
Fill out this field
Please enter a valid email address.
Fill out this field
ARTIST HEADSHOT
COMMERCIAL SHOOT
MODEL TEST
INTERIOR SHOOT
ACTOR HEADSHOT
MEDICAL HEADSHOT
INDUSTRIAL SHOOT
BUSINESS SHOOT
MUSICIANT HEADSHOT
ONLINE REMOTE INTERVIEWS
POSCAST / INTERVIEW REC
GREEN SCREEN PRODUCTION
PHOTO STUDIO RENTAL
VIDEO STUDIO RENTAL
BLOG
REQUEST
STUDIO POLICY
PRODUCTIONS

          Useful information about working in the studio from the blog

+1 (347) 858-5857
37 W 26th St studio 315, New York, NY 10010
2025 All Rights Reserved